
| 일 | 월 | 화 | 수 | 목 | 금 | 토 |
|---|---|---|---|---|---|---|
| 1 | 2 | |||||
| 3 | 4 | 5 | 6 | 7 | 8 | 9 |
| 10 | 11 | 12 | 13 | 14 | 15 | 16 |
| 17 | 18 | 19 | 20 | 21 | 22 | 23 |
| 24 | 25 | 26 | 27 | 28 | 29 | 30 |
- 힙덤프
- Calendar
- deque
- Union-find
- math
- 스택
- html
- BFS
- javascript
- set
- scanner
- dfs
- priority_queue
- 큐
- GC로그수집
- spring boot
- Java
- NIO
- 스프링부트
- CSS
- 리소스모니터링
- union_find
- JPA
- date
- map
- string
- Properties
- alter
- List
- sql
- Today
- Total
매일 조금씩
11/25 - Java(12) : BufferedReader와 Scanner, IO(DataInput(Output)Stream, ObjectInput(Output)Stream, RandomAccessFile, Properties), NIO(Buffer, FileChannel) 본문
11/25 - Java(12) : BufferedReader와 Scanner, IO(DataInput(Output)Stream, ObjectInput(Output)Stream, RandomAccessFile, Properties), NIO(Buffer, FileChannel)
mezo 2020. 11. 28. 00:16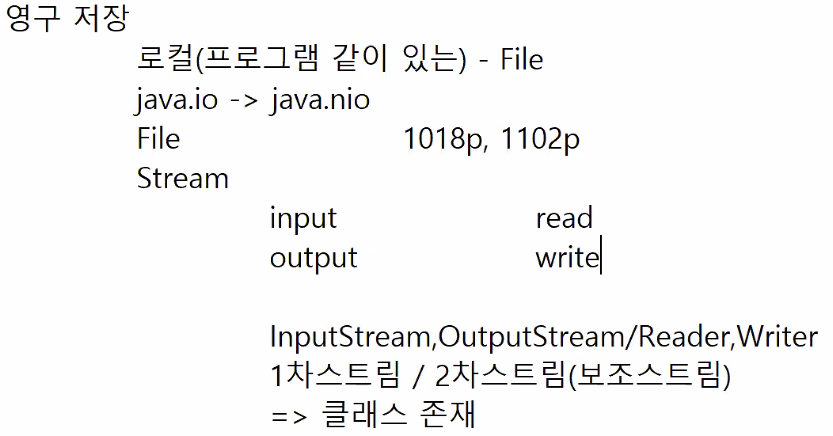
IO 기반 입출력 및 네트워킹
▷p1009
InputStream is = System.in 은 scanner의 시초이다.
InputStream is = null;
is = System.in;
이렇게 초기화랑 나누는건 is = System.in의 에러, 즉 입력에서 발생하는 에러를 잡기 위함이다.
read()는 한 문자를 읽기때문에 여러개를 읽어오고 싶으면 read()를 여러번 쓰면 된다.
(readLine()은 쓸 수 X . 버퍼를 사용해야 가능)
System.out.println("입력 데이터 : " + (char)is.read());
System.out.println("입력 데이터 : " + (char)is.read());
System.out.println("입력 데이터 : " + (char)is.read());
자동으로 그 다음걸 가리켜서 다음걸 읽는다.
그러나
다국어 입력이 안된다.
다국어 입력을 하려면 장치를 하나 마련해야한다. → 보조스트림!
▷p1029
문자 변환 보조 스트림으로 InputStreamReader를 추가로 쓴다.
InputStream is = null;
InputStreamReader isr = null;

is = System.in;
isr = new InputStreamReader(is);
한줄씩 읽으려면 BufferedReader를 추가로 쓴다. BufferedReader를 쓰면 readLine()을 사용 가능하기 때문이다.
InputStream is = null;
InputStreamReader isr = null;
BufferedReader br = null;

is = System.in;
isr = new InputStreamReader(is);
br = new BufferedReader(isr);
이렇게 여러개가 추가되어 길어지네?
그냥 BufferedReader하나를 쓰자!
InputStream
InputStreamReader
BufferedReader
이렇게 세개를 한줄로 줄여버리자!
BufferedReader br = null;

br = new BufferedReader(new InputStreamReader(System.in));
BufferedReader 하나로 줄여버렸다.
아래 두줄의 코드를 보자.
BufferedReader br = new BufferedReader(new InputStreamReader(System.in));

Scanner sc = new Scanner(System.in);
윗줄은 BufferedReader로 구현된 입력이고 아랫줄은 스캐너인데 둘의 모습이 매우 유사하다.
그리고 11/24일, 파일 입출력 할때 썼던 BufferedReader와도 매우 유사한 것을 알수 있다.
다음은 11/24의 자바 수업 코드의 일부이다.
BufferedReader br = null;

br = new BufferedReader(new FileReader("./test.txt"));
오늘 한 것과 괄호 안의 부분이 차이가 난다.
다국어 처리가 가능한 new InputStreamReader는 FileReader가 되었고,
입력을 받는 System.in 부분은 파일주소가 되었다.
문제) Scanner 대신 오늘 배운 BufferedReader 방식으로 동이름 입력받아서 해당 주소들 다 출력 + exit입력시 종료
1) 강사님이 준 가이드 코드 (startsWith()라는 String 메서드를 사용)
exit 가 입력되기 전까지 무한대로 입력을 받는 구문
import java.io.BufferedReader;
import java.io.FileNotFoundException;
import java.io.FileReader;
import java.io.IOException;
import java.io.InputStreamReader;
import java.util.Scanner;

public class SearchZipcode03 {

	public static void main(String[] args) {

		BufferedReader br = null;

		// exit가 입력되기 전까지 무한대로 입력을 받는 구문
		try {
			br = new BufferedReader(new InputStreamReader(System.in));
			while(true) {
				System.out.print("데이터 입력: ");
				String data = br.readLine();
				if(data.equals("exit")) {
					break;
				}
				System.out.println(">> " + data);
			}
			System.out.println("프로그램 종료");
		} catch (IOException e) {
			e.printStackTrace();
		} finally {
			if(br != null) try {br.close();} catch(IOException e) {}
		}

	}

}
2) 내가 짠 코드
import java.io.BufferedReader;
import java.io.FileNotFoundException;
import java.io.FileReader;
import java.io.IOException;
import java.io.InputStreamReader;

public class SearchZipcode02 {

	public static void main(String[] args) {

		// ****동이름 입력 받기
		BufferedReader sc = null;
		sc = new BufferedReader(new InputStreamReader(System.in));
		System.out.print("동이름을 입력하세요 : ");
		String dong = "";

		try {
			dong = sc.readLine();

			// 바른 입력이 들어올 때까지 입력을 받음
			while(true) {
				// 조건 1 - 한글입력
				boolean collect = true;
				for(int i = 0; i < dong.length(); i++) {
					char ch = dong.charAt(i);
					if(!(ch >='가' && ch <= '힣')) {
						System.out.println("한글을 입력하셔야 합니다.");
						collect = false;
						break;
					}
				}

				// 조건 2 - 2글자 이상 입력
				// 한글일 때만 실행
				if(collect) {
					if(dong.length() < 2) {
						System.out.println("2자리 이상 입력하셔야 합니다.");
					}else {
						break;
					}
				}

				// 두가지 조건을 모두 충족하지 못했다면 다시 입력
				System.out.print("동이름을 입력하세요 : ");
				dong = sc.readLine();
			}
		} catch (IOException e1) {
			// TODO Auto-generated catch block
			e1.printStackTrace();
		}finally {
			if(sc != null) try { sc.close();} catch(IOException e) {}
		}


		// ****파일입출력
		String data = null;
		BufferedReader br = null;

		try {
			br = new BufferedReader(new FileReader("./zipcode_seoul_utf8_type2.csv"));

			while((data = br.readLine()) != null) {

				String[] datas = data.split(",");

				String dong3 = datas[3];

				if(dong3.startsWith(dong)) {
					System.out.println(data);
				}

			}
			System.out.println();

		} catch (FileNotFoundException e) {
			// TODO Auto-generated catch block
			e.printStackTrace();
		} catch (IOException e) {
			// TODO Auto-generated catch block
			e.printStackTrace();
		}finally {
			if(br != null) try { br.close();} catch(IOException e) {}
		}

	}

}
2. Scanner 클래스
▷p1018
import java.util.Scanner;
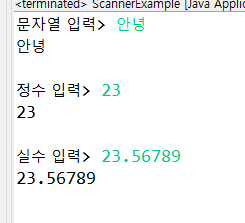
public class ScannerExample {
public static void main(String[] args) {
Scanner scanner = new Scanner(System.in);
System.out.print("문자열 입력> ");
String inputString = scanner.nextLine();
System.out.println(inputString);
System.out.println();
System.out.print("정수 입력> ");
int inputInt = scanner.nextInt();
System.out.println(inputInt);
System.out.println();
System.out.print("실수 입력> ");
Double inputDouble = scanner.nextDouble();
System.out.println(inputDouble);
}
}
3. 기본 타입 입출력 보조 스트림
▷p1037
앞에서 다뤘던 것들은 모두 바이트 스트림에 관한 것들이였다.
때문에 숫자를 입력하면 그대로 읽지 않고 ascii코드로 읽었다.
이렇듯 바이트 스트림은 바이트 단위로 입출력하기 때문에
자바의 기본 데이터 타입인 boolean, char, short, int, long, float, double 단위로 입출력 할 수 없다.
그러나 DataInputStream과 DataOutputStream 보조 스트림을 연결하면 기본 데이터 타입으로 입출력이 가능하다.
3-1. 입출력
1) DataOutputStream
import java.io.DataOutputStream;
import java.io.FileNotFoundException;
import java.io.FileOutputStream;
import java.io.IOException;

public class DataIOEx01 {

	public static void main(String[] args) {

		DataOutputStream dos = null;

		try {
			dos = new DataOutputStream( new FileOutputStream("./value.dat") );

			dos.writeInt(2020);
			dos.writeUTF("UTF-8 형식으로 저장"); // UTF가 문자열이다.
			dos.writeFloat(1.8f);

			System.out.println("출력 완료");
		} catch (FileNotFoundException e) {
			e.printStackTrace();
		} catch (IOException e) {
			e.printStackTrace();
		}finally {
			if(dos != null) try { dos.close();} catch(IOException e) {}
		}

	}

}
2) DataInputStream
import java.io.DataInputStream;
import java.io.FileInputStream;
import java.io.FileNotFoundException;
import java.io.IOException;

public class DataIOEx02 {

	public static void main(String[] args) {

		DataInputStream dis = null;

		try {
			dis = new DataInputStream(new FileInputStream("./value.dat"));

			System.out.println(dis.readInt());
			System.out.println(dis.readUTF());
			System.out.println(dis.readFloat());

			System.out.println("출력완료");
		} catch (FileNotFoundException e) {
			e.printStackTrace();
		} catch (IOException e) {
			e.printStackTrace();
		} finally {
			if(dis != null) try {dis.close();} catch(IOException e) {}
		}
	}

}
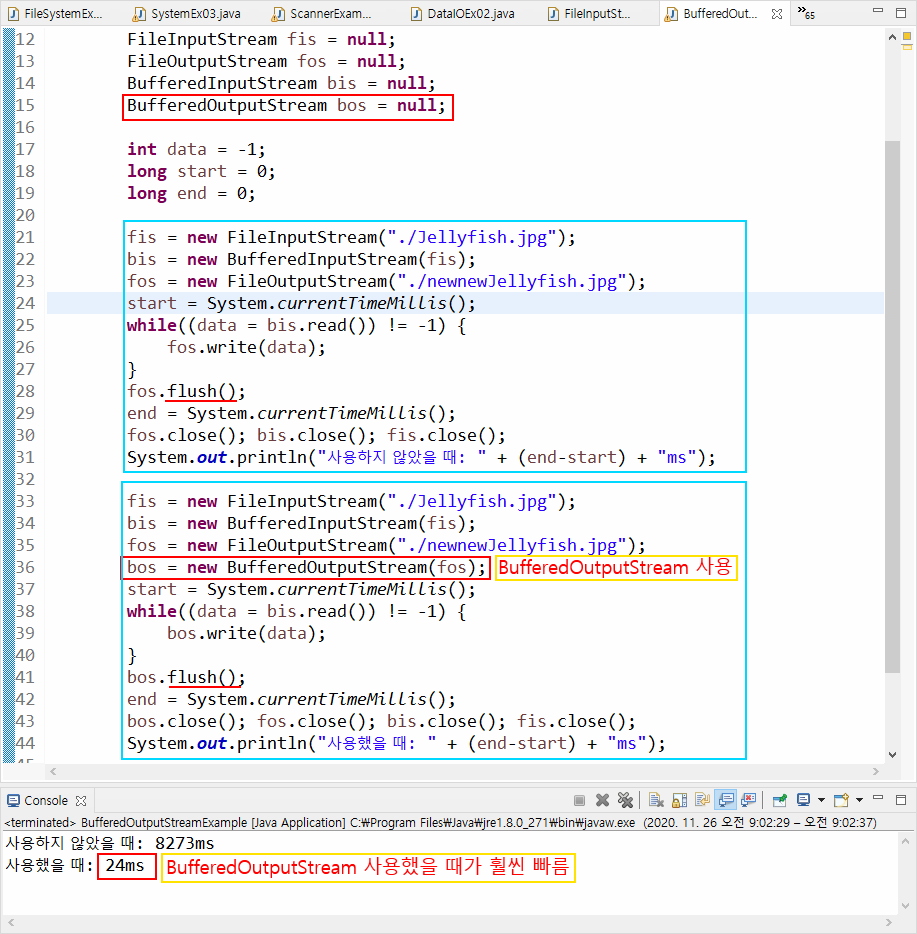
3-2. 버퍼 사용
BufferedOutputStream을 사용했을 때와 사용하지 않았을 때의 프로그램 실행 성능 차이 (사용했을 때가 훨씬 좋다.)
throw Exception -> JVM에서 예외 처리 한다.
- flush() : OutputStream에 속해있고, 출력 스트림과 버퍼된 출력 바이트를 강제로 쓰게 한다. buffer가 다 차기 전에 프로그램을 종료하면 buffer에 들어있는 내용은 파일에 쓰여지지 않는다. 그때 flush()를 호출하면 buffer의 내용이 파일에 쓰여진다. flush()와 close()를 같이 쓰는데, 사실 close 함수가 내부적으로 flush함수를 호출한다고 한다.
import java.io.BufferedInputStream;
import java.io.BufferedOutputStream;
import java.io.FileInputStream;
import java.io.FileNotFoundException;
import java.io.FileOutputStream;
import java.io.IOException;

public class BufferedOutputStreamExample {

	public static void main(String[] args) throws Exception{

		FileInputStream fis = null;
		FileOutputStream fos = null;
		BufferedInputStream bis = null;
		BufferedOutputStream bos = null;

		int data = -1;
		long start = 0;
		long end = 0;

		fis = new FileInputStream("./Jellyfish.jpg");
		bis = new BufferedInputStream(fis);
		fos = new FileOutputStream("./newnewJellyfish.jpg");
		start = System.currentTimeMillis();
		while((data = bis.read()) != -1) {
			fos.write(data);
		}
		fos.flush();
		end = System.currentTimeMillis();
		fos.close(); bis.close(); fis.close();
		System.out.println("사용하지 않았을 때: " + (end-start) + "ms");

		fis = new FileInputStream("./Jellyfish.jpg");
		bis = new BufferedInputStream(fis);
		fos = new FileOutputStream("./newnewJellyfish.jpg");
		bos = new BufferedOutputStream(fos);
		start = System.currentTimeMillis();
		while((data = bis.read()) != -1) {
			bos.write(data);
		}
		bos.flush();
		end = System.currentTimeMillis();
		bos.close(); fos.close(); bis.close(); fis.close();
		System.out.println("사용하지 않았을 때: " + (end-start) + "ms");

	}

}
4. 객체 입출력 보조 스트림
▷p1043
객체는 문자가 아니기 때문에 바이트 기반 스트림으로 출력해야 한다.
객체를 출력하기 위해서는 객체의 데이터(필드값)를 일렬로 늘어선 연속적인 바이트로 변경해야 하는데,
이것을 객체 직렬화라고 한다.
4-1. 내장 객체
1) ObjectInputStream
import java.io.FileNotFoundException;
import java.io.FileOutputStream;
import java.io.IOException;
import java.io.ObjectOutputStream;

public class ObjectIOEx01 {

	public static void main(String[] args) {

		ObjectOutputStream oos = null;

		try {
			oos = new ObjectOutputStream(new FileOutputStream("./data.dat"));

			// 내장객체 / 기본객체
			String[] names = {"홍길동", "박문수", "이몽룡"};
			int[] ages = {55,23,47};
			double[] weight = {71.4,67.9,58.6};

			oos.writeObject(names);
			oos.writeObject(ages);
			oos.writeObject(weight);

			System.out.println("저장 완료");
		} catch (FileNotFoundException e) {
			e.printStackTrace();
		} catch (IOException e) {
			e.printStackTrace();
		} finally {
			if( oos != null ) try { oos.close();} catch(IOException e) {}
		}
	}

}
2) ObjectOutputStream
import java.io.FileInputStream;
import java.io.FileNotFoundException;
import java.io.IOException;
import java.io.ObjectInputStream;
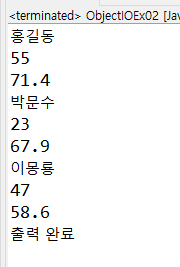
public class ObjectIOEx02 {
public static void main(String[] args) {
ObjectInputStream ois = null;
try {
ois = new ObjectInputStream( new FileInputStream("./data.dat"));
// 객체를 받아와서 원래 형태의 배열로 강제 타입변환 해줘야한다.
String[] names = (String[])ois.readObject();
int[] ages = (int[])ois.readObject();
double[] weight = (double[])ois.readObject();
for(int i = 0; i < names.length; i++) {
System.out.println(names[i]);
System.out.println(ages[i]);
System.out.println(weight[i]);
}
System.out.println("출력 완료");
} catch (FileNotFoundException e) {
// TODO Auto-generated catch block
e.printStackTrace();
} catch (ClassNotFoundException e) {
// TODO Auto-generated catch block
e.printStackTrace();
} catch (IOException e) {
// TODO Auto-generated catch block
e.printStackTrace();
} finally {
if( ois != null ) try { ois.close();} catch(IOException e) {}
}
}
}
기본타입 배열을 객체로 만들어도 된다.
ex)
int[] ages = {55,23,47};
double[] weight = {71.4,67.9,58.6};

oos.writeObject(ages);
oos.writeObject(weight);
4-2. 사용자 정의 객체
그럼 배열같은 내장 객체밖에 안되나? 아니다! 내가 만든 걸 넘길 수도 있다!
먼저 사용자 정의 객체를 만들기 위한 Person클래스를 만들고,
이 Person클래스를 가지고 ObjectInputStream과 ObjectInputStream을 구현한다.
▷p1045
직렬화를 위해서 Person 클래스에 implements Serializable를 한 후, 가져다가 쓴다.
- 사용자 정의 객체 - Person
import java.io.Serializable;

public class Person implements Serializable{
	private String name;
	private String phone;
	private int age;

	public Person(String name, String phone, int age) {
		super();
		this.name = name;
		this.phone = phone;
		this.age = age;
	}

	@Override
	public String toString() {
		return "Person [name=" + name + ", phone=" + phone + ", age=" + age + "]";
	}
- ObjectInputStream
import java.io.FileNotFoundException;
import java.io.FileOutputStream;
import java.io.IOException;
import java.io.ObjectOutputStream;

public class ObjectIOEx03 {

	public static void main(String[] args) {

		ObjectOutputStream oos = null;

		try {
			oos = new ObjectOutputStream(new FileOutputStream("./serial.dat"));

			// 객체를 만들어서
			Person p = new Person("홍길동", "010-1111-1111", 30);
			// 파일에 쓰기
			oos.writeObject(p);

			System.out.println("출력완료");
		} catch (FileNotFoundException e) {
			// TODO Auto-generated catch block
			e.printStackTrace();
		} catch (IOException e) {
			// TODO Auto-generated catch block
			e.printStackTrace();
		}finally {
			if( oos != null ) try { oos.close();} catch(IOException e) {}
		}
	}
}
- ObjectOutputStream
원래 타입으로 강제 형변환 해주는 거 필수!
import java.io.FileInputStream;
import java.io.IOException;
import java.io.ObjectInputStream;

public class ObjectIOEx04 {

	public static void main(String[] args) {

		ObjectInputStream ois = null;

		try {
			ois = new ObjectInputStream(new FileInputStream("./serial.dat"));

			// 가장 중요한 구문 !! 원래형태로 강제 형변환 필수!
			Person p = (Person)ois.readObject();

			System.out.println(p.toString());
		} catch (ClassNotFoundException e) {
			// TODO Auto-generated catch block
			e.printStackTrace();
		} catch (IOException e) {
			// TODO Auto-generated catch block
			e.printStackTrace();
		} finally {
			if( ois != null ) try { ois.close();} catch(IOException e) {}
		}

	}

}
1) 직렬화한 클래스로 파일 입출력
▷p1045
ClassA
import java.io.Serializable;

public class ClassA implements Serializable{
	int field1;
	ClassB field2 = new ClassB();
	static int field3;
	transient int field4;
}
ClassB
import java.io.Serializable;

public class ClassB implements Serializable{
	int field1;
}
SerializableWriter
Object.dat 파일에 시리얼화된 객체 classA를 쓴다.
import java.io.FileOutputStream;
import java.io.ObjectOutputStream;

public class SerializableWriter {

	public static void main(String[] args) throws Exception{

		FileOutputStream fos = new FileOutputStream("c:/Temp/Object.dat");
		ObjectOutputStream oos = new ObjectOutputStream(fos);
		ClassA classA = new ClassA();

		classA.field1 = 1;
		classA.field2.field1 = 2;
		classA.field3 = 3;
		classA.field4 = 4;

		oos.writeObject(classA);
		oos.flush(); oos.close(); fos.close();

	}

}
SerializableReader
시리얼화되어 Object.dat파일에 쓰인 ClassA의 객체를 다시 원래 타입으로 강제 형변환하여 가져온다.
import java.io.FileInputStream;
import java.io.ObjectInputStream;

public class SerializableReader{

	public static void main(String[] args) throws Exception{

		FileInputStream fis = new FileInputStream("c:/Temp/Object.dat");
		ObjectInputStream ois = new ObjectInputStream(fis);

		ClassA v = (ClassA)ois.readObject();
		System.out.println("field1: " + v.field1);
		System.out.println("field2.field1: " + v.field2.field1);
		System.out.println("field3: " + v.field3);
		System.out.println("field4: " + v.field4);
	}

}
5. 랜덤
RandomAccessFile
read와 write를 동시에 할수 있다는 점이 특징이다!
- seek() : 읽을 위치를 정할 수 있다.
RandomAccessFile raf = null;

raf = new RandomAccessFile("./score.dat", "rw");
이렇게 파일권한을 정해줄수 있다. "w" -> 이렇게는 못씀.
첫번째는r, 두번째는 w, ... 뭐 이렇게 되는데 반드시 앞에 것들과 함께 쓰여야함.
ex) r, rw, rws, rwd ...
while(true)를 돌리면 break를 직접적으로 처리할 수 없으니까
루프가 끝남을 알리는 예외처리(EOFException)가 걸리는데 그 안에서 프로그램이 종료됨을 알리는 코드를 넣어준다.
내가 쓴만큼 실행된다는 전제가 있어서 그렇다.
import java.io.EOFException;
import java.io.FileNotFoundException;
import java.io.IOException;
import java.io.RandomAccessFile;
public class RandomAccessFileEx01 {
public static void main(String[] args) {
RandomAccessFile raf = null;
try {
// rw - read / write
raf = new RandomAccessFile("./score.dat", "rw");
int[] scores = {
1, 100, 90, 90,
2, 70, 90, 100,
3, 100, 100, 100
};
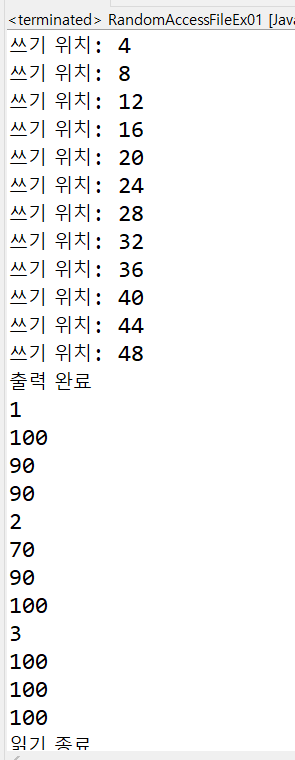
for(int i=0; i<scores.length; i++) {
raf.writeInt(scores[i]);
System.out.println("쓰기 위치: " + raf.getFilePointer());
}
System.out.println("출력 완료");
raf.seek(0); // 나 읽을 준비가 됐어!
while(true) {
System.out.println(raf.readInt());
}
} catch (EOFException e) {
System.out.println("읽기 종료");
} catch (FileNotFoundException e) {
// TODO Auto-generated catch block
e.printStackTrace();
} catch (IOException e) {
// TODO Auto-generated catch block
e.printStackTrace();
} finally {
if( raf != null ) try { raf.close();} catch(IOException e) {}
}
}
}
6. Properties 를 활용한 파일 입출력
※ Properties 란?
generic 이 없는 map과 같다.
map 처럼 키, 값 쌍으로 이루어져 있으며, generic이 없어서 데이터 타입의 일관성을 위한 제한을 두지 않는다.
- store( , ) : Properties 값을 파일에 씀
- load( ) : 파일에 쓴 Properies 값을 읽음
다음 코드에선 setProperty( , )를 통해 키, 값 쌍을 props 에 넣고, store( , )로 파일에 쓴다.
import java.io.FileWriter;
import java.io.IOException;
import java.util.Properties;

public class PropertiesEx01 {

	public static void main(String[] args) {

		Properties props = new Properties();
		props.setProperty("id", "andy");
		props.setProperty("pass", "1234");
		props.setProperty("addr", "192.168.0.11");

		System.out.println(props.toString());

		FileWriter fw = null;

		try {
			fw = new FileWriter("./config.properties");
			// save -> store
			props.store(fw, "System Config");

			System.out.println("출력 완료");
		} catch (IOException e) {
			// TODO Auto-generated catch block
			e.printStackTrace();
		} finally {
			if(fw != null) try { fw.close();} catch(IOException e) {}
		}
	}

}

▷p748
다음 코드에선 파일에 쓰여진 props의 값들을 load() 로 읽어온 후, getProperty(키) 를 통해 키로 값을 가져온다.
import java.io.FileNotFoundException;
import java.io.FileReader;
import java.io.IOException;
import java.util.Properties;
public class PropertiesEx02 {
public static void main(String[] args) {
Properties props = new Properties();
FileReader fr = null;
try {
fr = new FileReader("./config.properties");
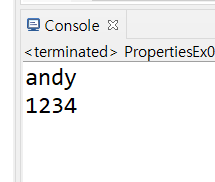
props.load(fr);
System.out.println(props.getProperty("id"));
System.out.println(props.getProperty("pass"));
} catch (FileNotFoundException e) {
// TODO Auto-generated catch block
e.printStackTrace();
} catch (IOException e) {
// TODO Auto-generated catch block
e.printStackTrace();
} finally {
if(fr != null) try { fr.close();} catch(IOException e) {}
}
}
}
좀더 깊게 들어가고 싶다면..
NIO 기반 입출력 및 네트워킹 (추가)
1. 버퍼
▷p1114
NIO는 데이터를 입출력하기 위해 항상 버퍼를 사용한다. 버퍼는 읽고 쓰기가 가능한 메모리 배열이다.
버퍼를 이해하고 잘 사용할수 있어야 NIO에서 제공하는 API를 올바르게 활용할 수 있다.
Buffer는 저장되는 데이터 타입에 따라 분류될 수 있고,
어떤 메모리를 사용하느냐에 따라 다이렉트(Direct)와 넌다이렉트(NonDirect)로 분류할 수 있다.
버퍼가 사용하는 메모리의 위치에 따라 넌다이렉트 버퍼와 다이렉트 버퍼로 분류된다.
넌다이렉트 버퍼는 JVM이 관리하는 힙 메모리 공간을 이용하는 버퍼이고,
다이렉트 버퍼는 운영체제가 관리하는 메모리 공간을 이용하는 버퍼이다.
넌다이렉트 버퍼는 버퍼 생성이 빠르고 버퍼의 크기가 작으며 입출력 성능이 높다.
다이렉트 버퍼는 버퍼 생성이 느리고 버퍼의 크기가 크며 입출력 성능이이 높다.
따라서 큰 데이터를 처리하거나 입출력이 빈번할때는 다이렉트 버퍼를 사용하는 것이 유리하다.
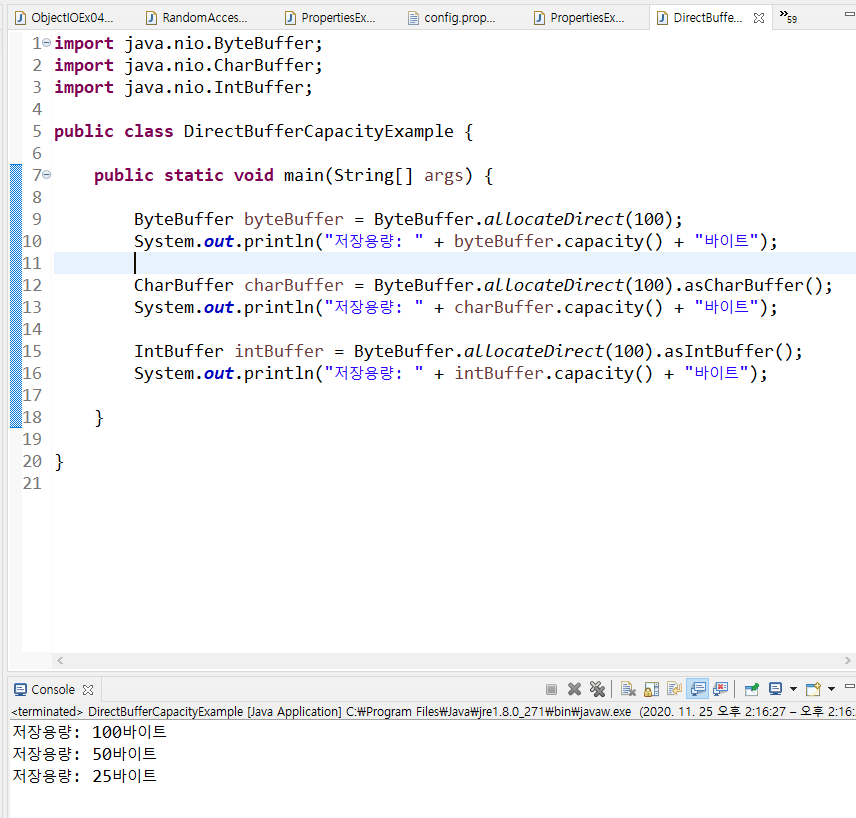
각 데이터 타입별로
넌다이렉트 버퍼를 생성하기 위해서는 각 Buffer 클래스의 allocate() 와 wrap() 메소드를 호출하면 되고,
다이렉트 버퍼는 ByteBuffer의 allocateDirect() 메소드를 호출하면 된다.
버퍼 용량이 어떻게 만들어지는지? ▷p1120 예제
1-1. 버퍼의 위치 속성
▷p1124-1125
- position
- limit
- capacity
- mark
0 <= mark <= position <= limit <= capacity
mark는 position이 현재 위치를 저장하기 위한 것.
limit은 끝지점을 정할 수 있게 하는 것으로 처음엔 capacity와같음
1-2. 여러가지 버퍼 관련 메소드
▷p1126-1127
- flip() : limit를 position으로, position을 0 인덱스로 이동
- clear() : 버퍼의 위치 속성을 초기화(position = 0, limit = capacity)
- mark() : 현재 위치를 mark로 표시
- reset() : position을 mark 위치로 이동
- rewind() : position을 0 인덱스로 이동
printState(버퍼객체)로 읽는다.
1-3. 버퍼 사용 예제
메모리에 버퍼 생성해서 버퍼에 넣고 필요하면 파일에 넣을 수 있다.
▷p1129
import java.nio.Buffer;
import java.nio.ByteBuffer;
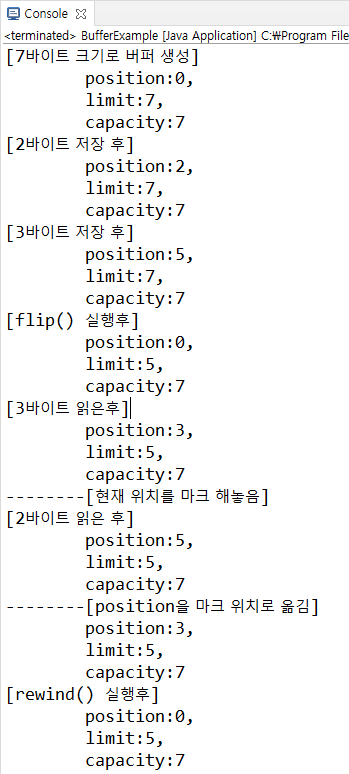
public class BufferExample {
public static void main(String[] args) {
System.out.println("[7바이트 크기로 버퍼 생성]");
// 다이렉트 버퍼 생성 (메모리에 버퍼 생성)
ByteBuffer buffer = ByteBuffer.allocateDirect(7);
printState(buffer);
// 상대적 저장
buffer.put((byte)10);
buffer.put((byte)11);
System.out.println("[2바이트 저장 후]");
printState(buffer);
// 상대적 저장
buffer.put((byte)12);
buffer.put((byte)13);
buffer.put((byte)14);
System.out.println("[3바이트 저장 후]");
printState(buffer);
// 데이터를 읽기 위해 위치 속성값 변경
buffer.flip();
System.out.println("[flip() 실행후]");
printState(buffer);
buffer.get(new byte[3]);
System.out.println("[3바이트 읽은후]");
printState(buffer);
buffer.mark();
System.out.println("--------[현재 위치를 마크 해놓음]");
buffer.get(new byte[2]);
System.out.println("[2바이트 읽은 후]");
printState(buffer);
buffer.reset();
System.out.println("--------[position을 마크 위치로 옮김]");
printState(buffer);
buffer.rewind();
System.out.println("[rewind() 실행후]");
printState(buffer);
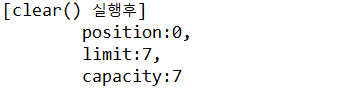
buffer.clear();
System.out.println("[clear() 실행후]");
printState(buffer);
}
public static void printState(Buffer buffer) {
System.out.println("\tposition:" + buffer.position() + ", ");
System.out.println("\tlimit:" + buffer.limit() + ", ");
System.out.println("\tcapacity:" + buffer.capacity());
}
}
2. 파일 채널
▷p1136
java.nio.channels.FileChannel 을 이용하면 파일 읽기와 쓰기를 할 수 있다.
FileChannel은 동기화 처리가 되어 있기 때문에 멀티 스레드 환경에서 사용해도 안전하다.
2-1. 파일 쓰기와 읽기
1) 파일에 쓰기
파일 읽기와 쓰기를 할때 반드시 버퍼로 만드는 과정을 거쳐야한다.
핵심 포인트는 반드시 버퍼로 만들어준 다음에 쓴다는 것이다.
String msg = "Hello FileChannel";
// 반드시 버퍼로 만들어준 다음에 쓴다!
ByteBuffer byteBuffer = utf8.encode(msg);
int byteCount = writeChannel.write(byteBuffer);
위 코드처럼 String을 ByteBuffer로 만든 다음에 쓴다.
import java.io.IOException;
import java.nio.ByteBuffer;
import java.nio.channels.FileChannel;
import java.nio.charset.Charset;
import java.nio.file.Path;
import java.nio.file.Paths;
import java.nio.file.StandardOpenOption;

public class FileChannelEx01 {

	public static void main(String[] args) {

		Path srcFile = Paths.get("./channel.txt");
		Charset utf8 = Charset.forName("utf-8");

		FileChannel writeChannel = null;

		try {
			writeChannel = FileChannel.open(
					srcFile, StandardOpenOption.CREATE, StandardOpenOption.WRITE);

			String msg = "Hello FileChannel";
			// 반드시 버퍼로 만들어준 다음에 쓴다!
			ByteBuffer byteBuffer = utf8.encode(msg);
			int byteCount = writeChannel.write(byteBuffer);

			System.out.println("출력완료");
		} catch (IOException e) {
			// TODO Auto-generated catch block
			e.printStackTrace();
		} finally {
			if(writeChannel != null) try { writeChannel.close();} catch(IOException e) {}
		}
	}

}
2) 파일 읽기
Path path = Paths.get("./channel.txt");

FileChannel fileChannel = FileChannel.open(
        path, StandardOpenOption.READ);
먼저 위 코드처럼 FileChannel로 파일에 대한 권한 설정을 한다.
그리곤 버퍼로 만든것을 이전으로 되돌린다.
import java.io.IOException;
import java.nio.ByteBuffer;
import java.nio.channels.FileChannel;
import java.nio.charset.Charset;
import java.nio.file.Path;
import java.nio.file.Paths;
import java.nio.file.StandardOpenOption;
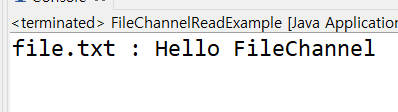
public class FileChannelReadExample {
public static void main(String[] args) throws IOException{
Path path = Paths.get("./channel.txt");
FileChannel fileChannel = FileChannel.open(
path, StandardOpenOption.READ);
ByteBuffer byteBuffer = ByteBuffer.allocate(100);
Charset charset = Charset.defaultCharset();
String data = "";
int byteCount;
while(true){
byteCount = fileChannel.read(byteBuffer);
if(byteCount == -1) break;
byteBuffer.flip();
data += charset.decode(byteBuffer).toString();
byteBuffer.clear();
}
fileChannel.close();
System.out.println("file.txt : " + data);
}
}
2-2. 파일 복사
▷p1140
파일 복사를 할때 역시 버퍼로 만드는 과정을 거쳐야한다.
import java.io.IOException;
import java.nio.ByteBuffer;
import java.nio.channels.FileChannel;
import java.nio.file.Path;
import java.nio.file.Paths;
import java.nio.file.StandardOpenOption;

public class FileCopyExample {

	public static void main(String[] args) throws IOException{

		Path from = Paths.get("./Jellyfish.jpg");
		Path to = Paths.get("./NIO_Jellyfish.jpg");

		FileChannel fileChannel_from = FileChannel.open(
				from, StandardOpenOption.READ);

		FileChannel fileChannel_to = FileChannel.open(
				to, StandardOpenOption.CREATE, StandardOpenOption.WRITE);

		ByteBuffer buffer = ByteBuffer.allocateDirect(100);

		int byteCount;

		while(true){
			buffer.clear();
			byteCount = fileChannel_from.read(buffer);
			if(byteCount == -1) break;
			buffer.flip();
			fileChannel_to.write(buffer);
		}

		fileChannel_from.close();
		fileChannel_to.close();
		System.out.println("파일 복사 성공");

	}

}
2-3. 특수 파일 사용
기본적인 파일 이외의 특수 파일이 있다.
외부(제작업체)에서 제공하는 API가 있어야 한다.
1. office
excel, word
2. 한글
...
excel
csv - ,를 구분자를 사용하는 파일
xsl - 특수형식
Apache POI
https://poi.apache.org/
MS
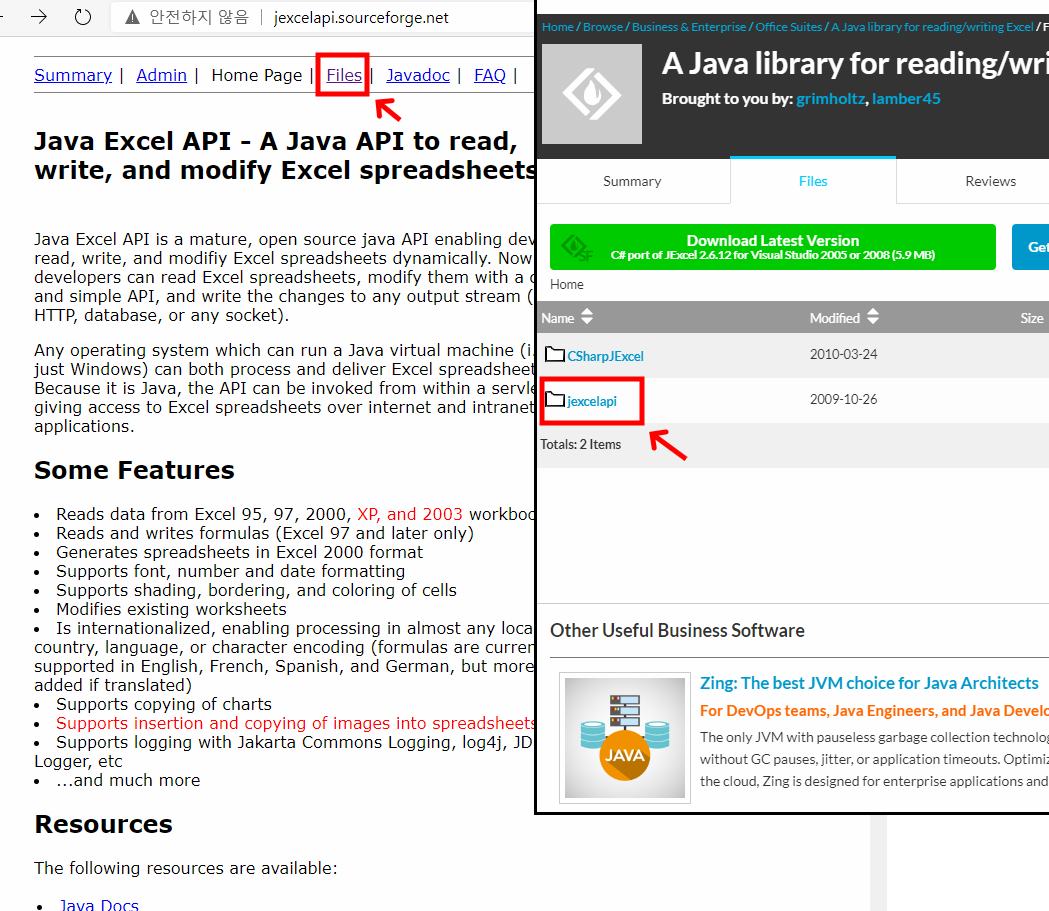
JXL
JExcelApi (sourceforge.net) -> 여기서 다운 jxl. jar 다운 가능 excel
JExcelApi
Java Excel API is a mature, open source java API enabling developers to read, write, and modifiy Excel spreadsheets dynamically. Now java developers can read Excel spreadsheets, modify them with a convenient and simple API, and write the changes to a
jexcelapi.sourceforge.net
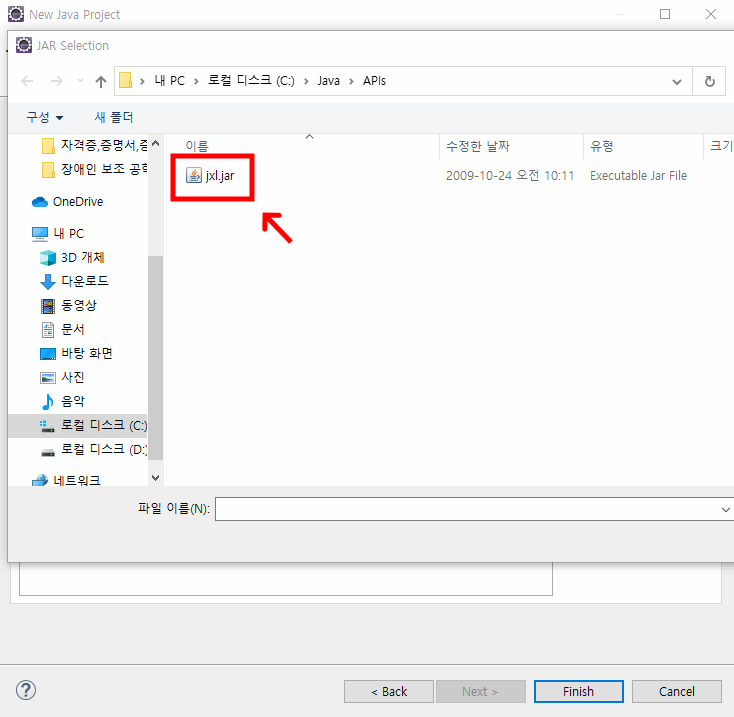
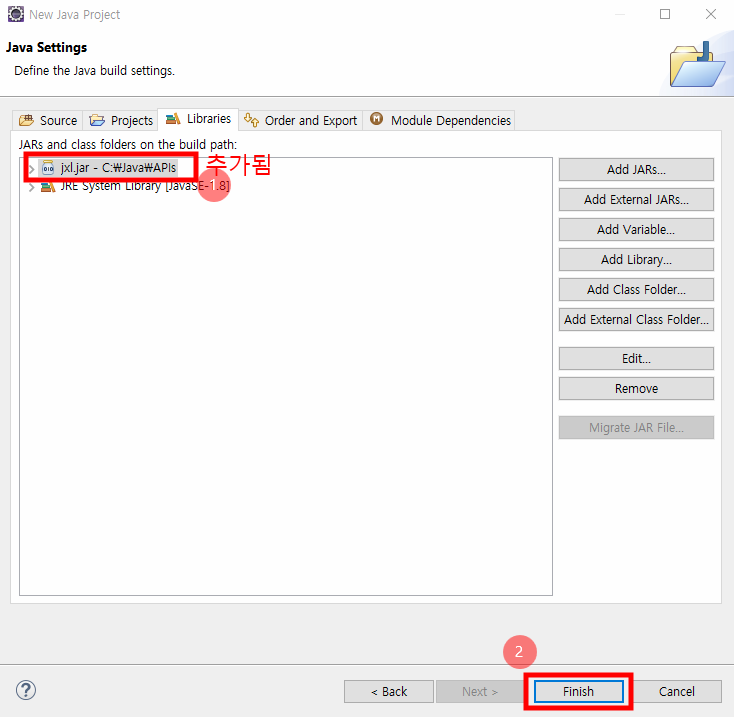
1) 엑셀 파일 사용전 세팅
위 사이트에 방문해서 파일을 다운로드 받는다.
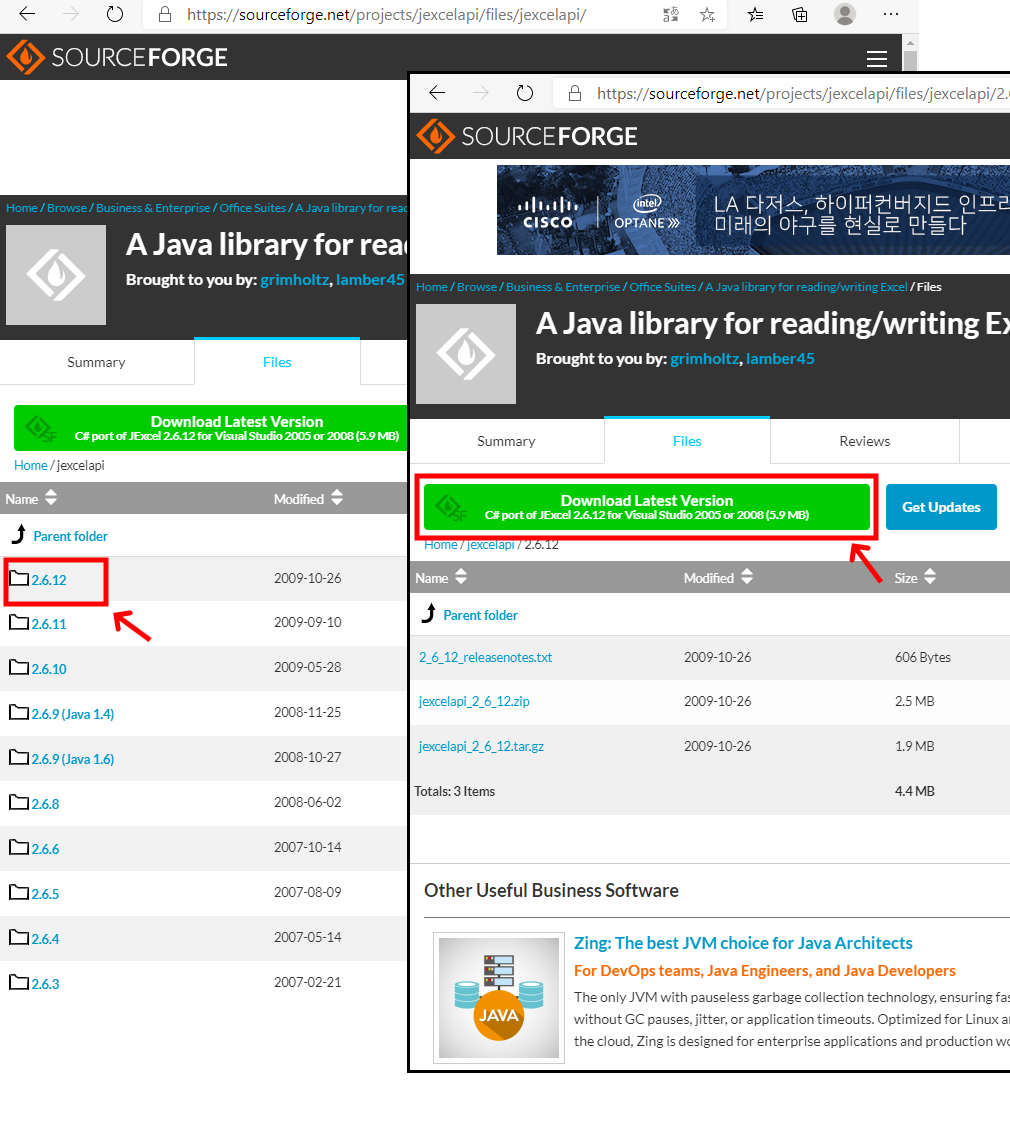
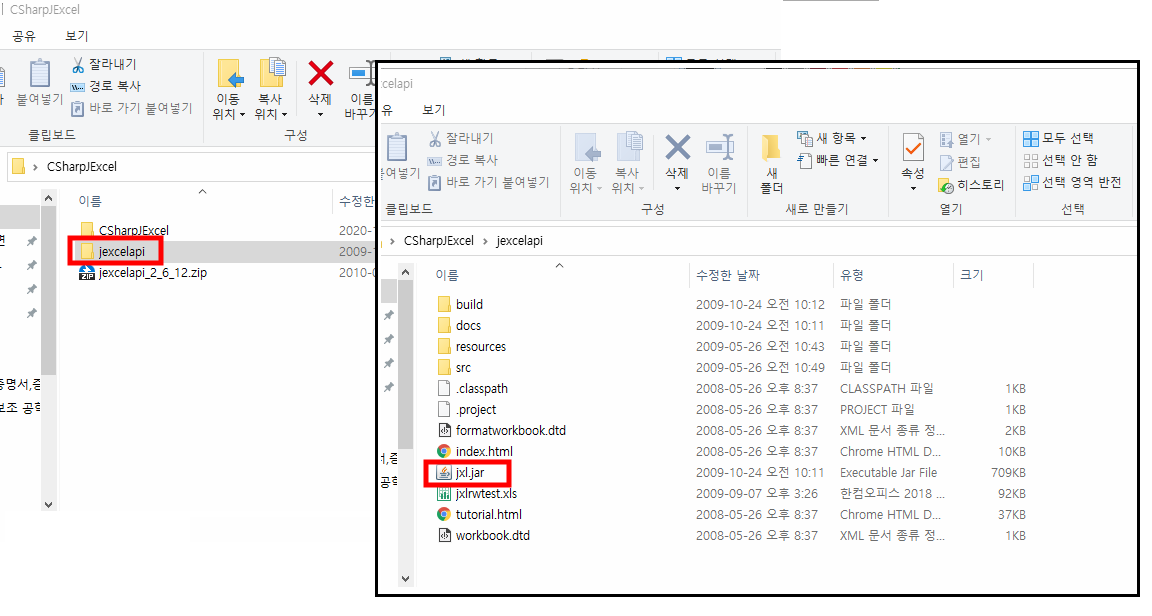
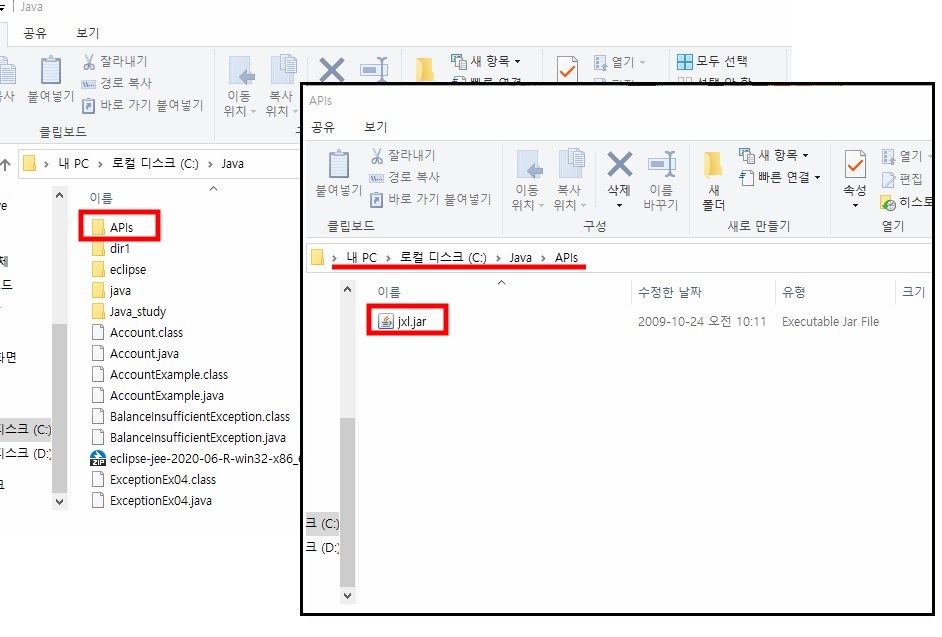
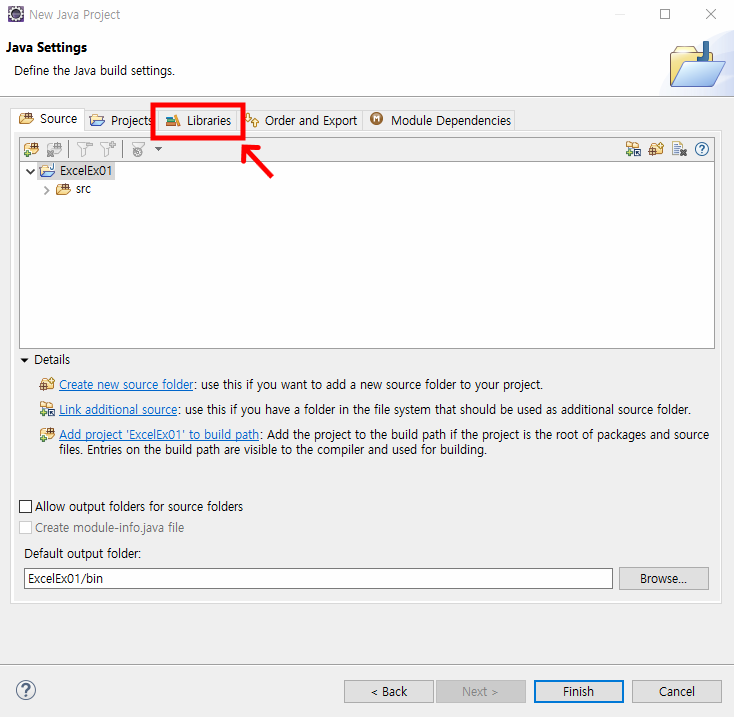
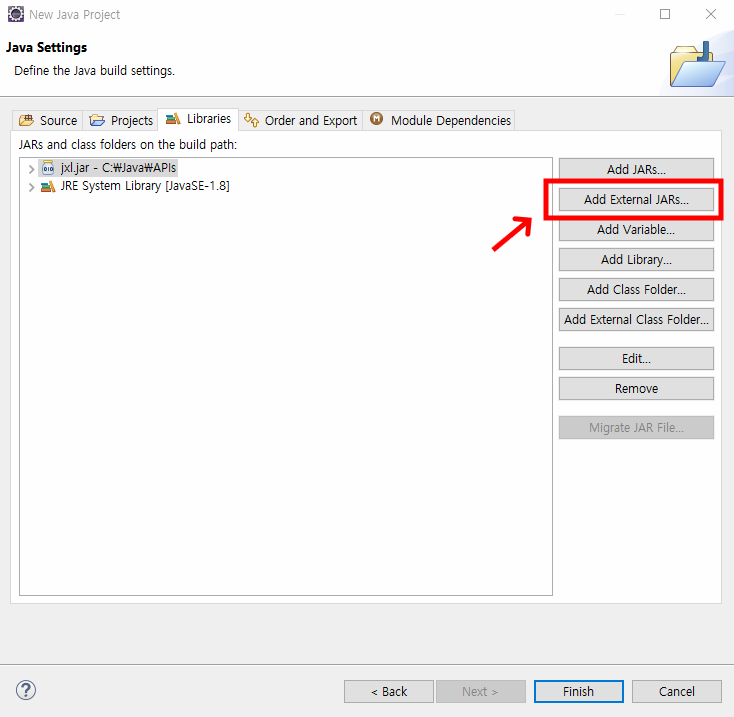
프로젝트를 만들 때 jxl.jar를 추가한다.
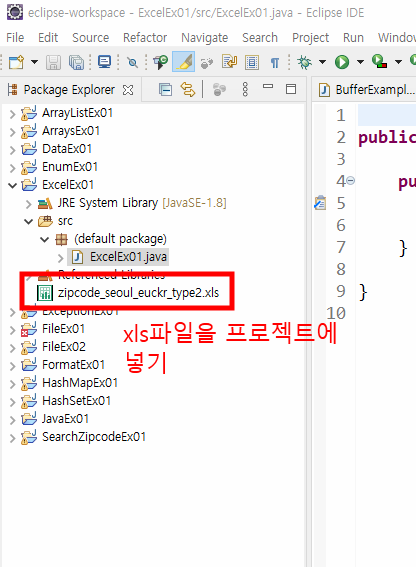
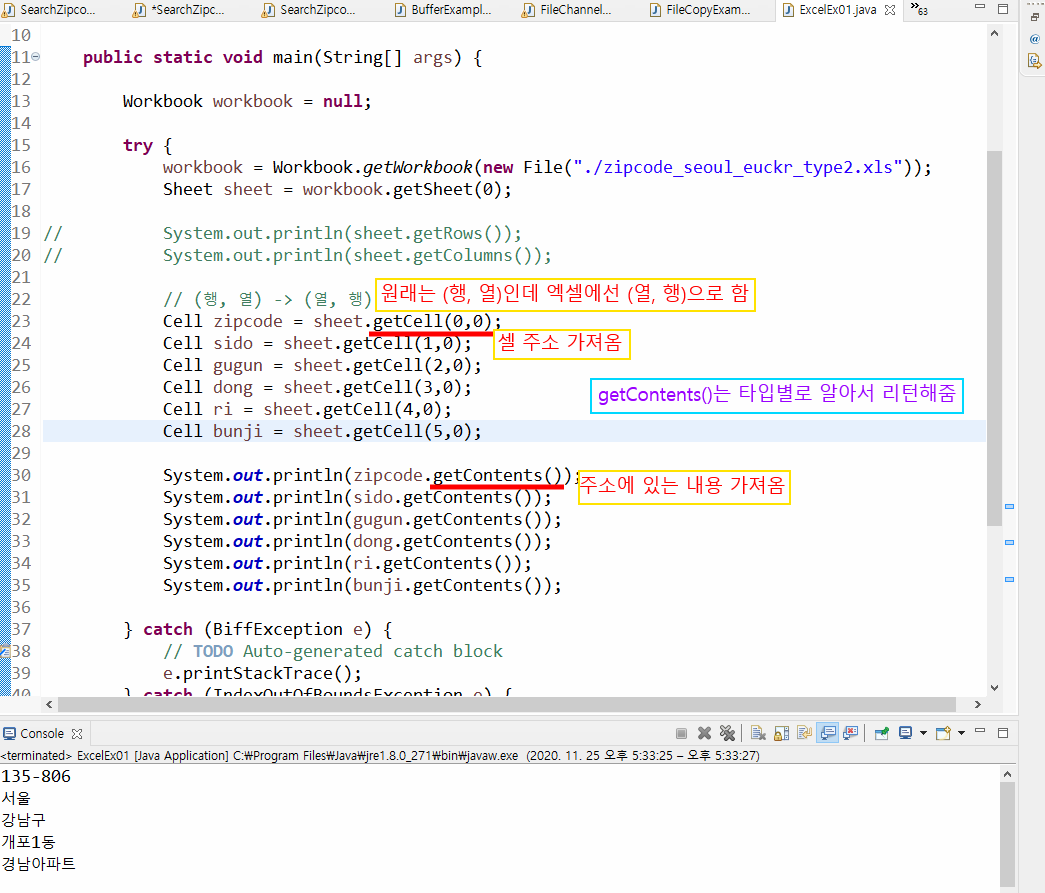
2) 엑셀 파일 사용하기
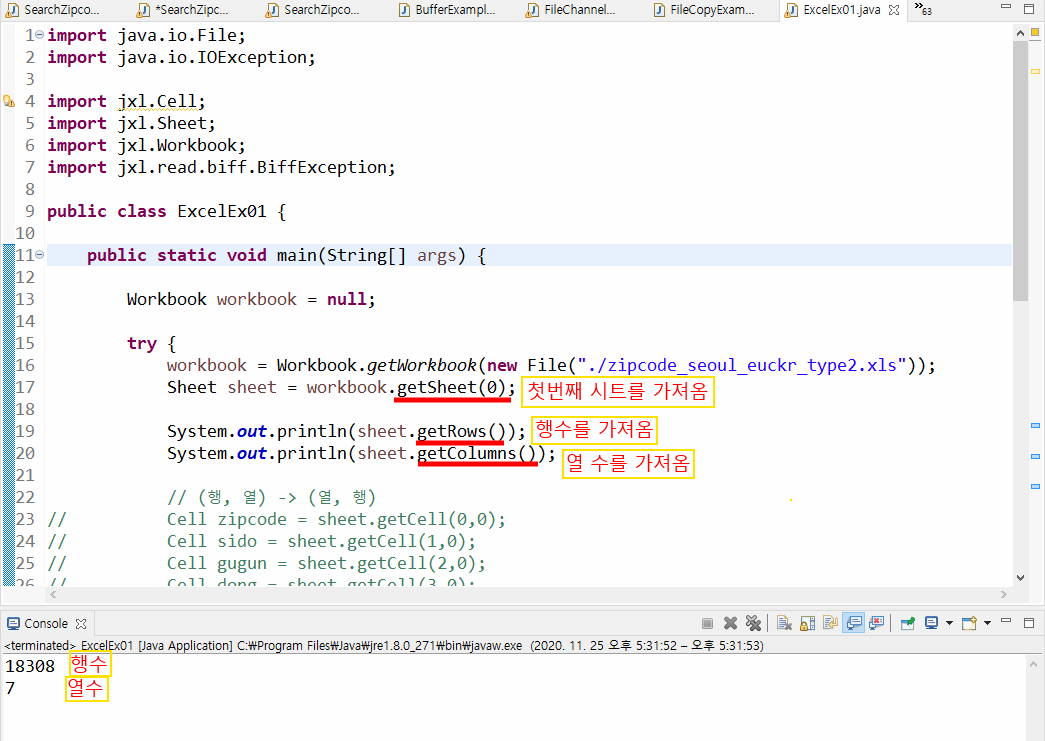
ExcelEx01.java
다운받은 jxl.jar 파일에서 여러가지 클래스를 import하여 사용한다.
문제) 우편번호 검색지 - excel
java SearchZipcode
동이름 : 신사
...
동이름 : 개포
...
동이름 : 끝
프로그램 종료
(1) 내코드
import java.io.File;
import java.io.IOException;
import java.util.Scanner;

import jxl.Cell;
import jxl.Sheet;
import jxl.Workbook;
import jxl.read.biff.BiffException;

public class SearchZipCode {

	public static void main(String[] args){

		Scanner sc = new Scanner(System.in);

		while(true) {
			System.out.print("동이름을 입력하세요 : ");
			String dong = sc.nextLine();

			if(dong.equals("끝")) {
				System.out.println("프로그램 종료");
				break;
			}

			Workbook workbook = null;

			try {
				workbook = Workbook.getWorkbook(new File("./zipcode_seoul_euckr_type2.xls"));
				Sheet sheet = workbook.getSheet(0);

				for(int i = 0; i<sheet.getRows(); i++) {
					// 동에 해당하는 셀 주소를 가져옴
					Cell excelDong = sheet.getCell(3,i);
					// 주소에 있는 값을 가져옴(String)
					String strDong = excelDong.getContents();
					// 입력받은 값으로 시작하는지 비교 후 출력
					if(strDong.startsWith(dong)) {
						String addr = "";
						// 해당 행의 셀값들 붙여서 주소로 만들기
						for(int j = 0; j <sheet.getColumns(); j++) {
							addr += sheet.getCell(j,i).getContents();
							// 해당 행의 끝 열이 아니면 반점 덧붙임
							if(j != sheet.getColumns()-1) {
								addr += ",";
							}
						}
						System.out.println(addr);
					}
				}
			} catch (BiffException e) {
				e.printStackTrace();
			} catch (IndexOutOfBoundsException e) {
				e.printStackTrace();
			} catch (IOException e) {
				e.printStackTrace();
			}finally {
				if(workbook != null) workbook.close();
			}
		}
	}
}


