
| 일 | 월 | 화 | 수 | 목 | 금 | 토 |
|---|---|---|---|---|---|---|
| 1 | 2 | 3 | 4 | 5 | 6 | 7 |
| 8 | 9 | 10 | 11 | 12 | 13 | 14 |
| 15 | 16 | 17 | 18 | 19 | 20 | 21 |
| 22 | 23 | 24 | 25 | 26 | 27 | 28 |
- 리소스모니터링
- javascript
- 스택
- GC로그수집
- NIO
- Union-find
- BFS
- html
- Java
- union_find
- 스프링부트
- 큐
- Properties
- List
- CSS
- map
- math
- JPA
- string
- set
- alter
- scanner
- 힙덤프
- Calendar
- sql
- spring boot
- date
- dfs
- deque
- priority_queue
- Today
- Total
매일 조금씩
12/03 - JDBC (1) : 연결(Connection), Statement, PreparedStatement, ResultSet, 데이터베이스 정보 가져오기(MetaData) 본문
12/03 - JDBC (1) : 연결(Connection), Statement, PreparedStatement, ResultSet, 데이터베이스 정보 가져오기(MetaData)
mezo 2020. 12. 4. 02:05[ Java에서 데이터를 저장하는 방식 2가지 ]
1. 임시
- 변수 / 상수
=> 자료구조
2. 영구
- 로컬 → 파일
- 원격 → 데이터베이스
java program이 데이터베이스에 접근하려면
client 가 server에 접근하기 위해 필요한 4가지가 필요하다.
1) ip
2) port
3) id / password
4) 데이터베이스 구조(ERD)
JDBC 프로그래밍
JDBC 란?
자바 언어로 다양한 종류의 관계형 데이터베이스에 접속하고 SQL문을 수행하여 처리하고자 할 때 사용되는 표준 SQL 인터페이스 API이다. JDBC는 자바의 표준 에디션에서 지원하는 기술로서, 접속하려는 DBMS 서버에 따라서 JDBC 드라이버가 필요하다.
Java.sql패키지 소속의 API를 제공한다.
DBMS와의 통신을 하려면 JDBC 드라이버(일종의 라이브러리 ~~.jar)가 필요하다.
(이클립스에서 프로젝트만들때 library에서 external APIs에서 다운받은 드라이버 추가해서 만든다.)
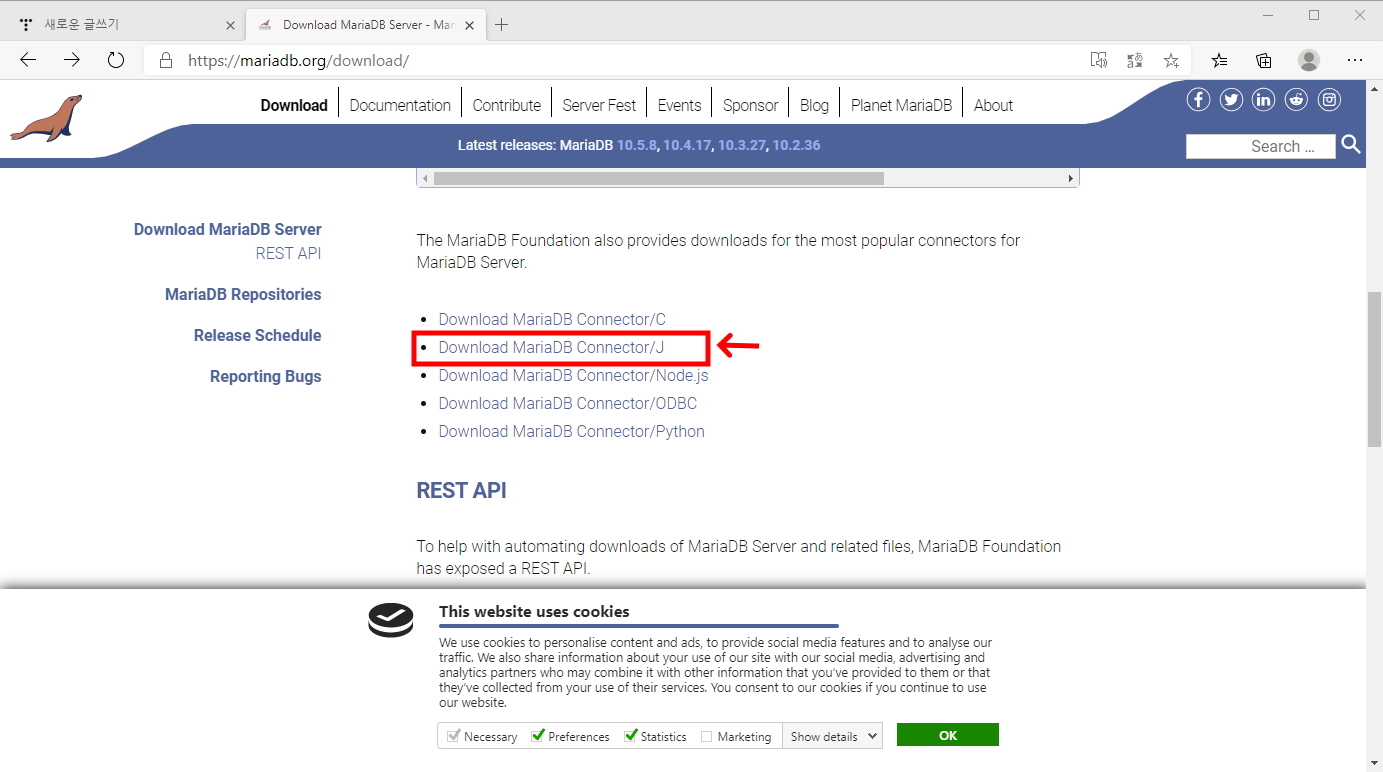
드라이버는 오라클이 아닌 데이터베이스 제공업체에서 제공한다. (mariadb)
JSP를 포함한 자바 어플리케이션에서 데이터베이스를 사용할 때에는 데이터베이스 종류에 상관없이 JDBC API를 이용해서 데이터베이스에 접근한다. 각각의 DBMS는 자신에게 알맞은 JDBC 드라이버를 제공하고 있다. JDBC는 JDBC API 드라이버를 거쳐 데이터베이스와 통신을 한다.
※ 개념 참고 포스팅
JDBC 프로그래밍 - JSP/서블릿 흝어 보기 (opentutorials.org)
JDBC 프로그래밍 - JSP/서블릿 흝어 보기
JDBC란? JDBC란, 자바 언어로 다양한 종류의 관계형 데이터베이스에 접속하고 SQL문을 수행하여 처리하고자 할 때 사용되는 표준 SQL 인터페이스 API입니다. JDBC는 자바의 표준 에디션에서 지원하는
opentutorials.org
JDBC 드라이버 다운로드


JDBC 구현하기
1. Connection - 접속
1-1. 드라이버 로딩
준비된 JDBC 드라이버 파일을 사용할 수 있도록 메모리에 로딩해야 한다.
Class.forName("org.mariadb.jdbc.Driver");JDBC 드라이버를 메모리에 동적으로 로딩하기 위해서는 Class.forName( )을 이용한다. forName( ) 메소드의 인자값으로는 JDBC 드라이버 파일 안에서 드라이버 인터페이스를 상속하고 있는 클래스이름을 패키지 이름과 함께 정확하게 명시해주어야 한다.
Class.forName( )에 의해 JDBC 드라이버 파일의 드라이버 인터페이스를 상속한 클래스가 동적으로 로딩될 때 자동으로 JDBC 드라이버 인스턴스가 생성되어 준비가 완료된다.
public class JDBCEx01 {

	public static void main(String[] args) {

		System.out.println("시작");
		try {
			// 연결될 드라이버를 로딩한다.
			// 클래스를 통해 데이터베이스랑 연결한다.
			// 그때그때마다 읽어온다.
			// 드라이버명 잘못치면 에러남
			Class.forName("org.mariadb.jdbc.Driver");
			// 로딩 완료 확인
			System.out.println("드라이버 로딩 성공");
		} catch (ClassNotFoundException e) {
			// TODO Auto-generated catch block
			// e.printStackTrace();
			System.out.println("[에러]" + e.getMessage());
		}
		System.out.println("끝");
	}

}
1-2. 드라이버 연결
▷p26-27
JDBC 드라이버의 사용준비가 완료되면 첫 번째 DB작업으로 DB서버와의 연결작업을 한다. 이 작업은 java.sql 패키지의 DriverManager 클래스의 getConnection( ) 메소드를 이용한다.
String url = "jdbc:mysql://localhost:3307/sample";  // 프로토콜, 서버주소,서버포트, DB이름
String user = "root";                               // DB서버에 로그인할 계정
String password = "!123456";                        // DB서버에 로그인할 비밀번호

Connection conn = null;                             // 예외처리에서 연결 닫아줘야함

conn = DriverManager.getConnection(url, user, password);
DriverManager.getConnection( ) 는 실제 자바 프로그램과 데이터베이스를 네트워크상에서 연결해주는 메소드이며 연결에 성공하면 DB와 연결된 상태를 Connection 객체로 표현하여 반환한다.
import java.sql.Connection;
import java.sql.DriverManager;
import java.sql.SQLException;

public class JDBCEx02 {

	public static void main(String[] args) {

		System.out.println("시작");
		try {
			// 연결될 드라이버를 로딩한다.
			// 클래스를 통해 데이터베이스 로딩
			// 그때그때마다 읽어온다.
			// 드라이버명 잘못치면 에러남
			Class.forName("org.mariadb.jdbc.Driver");
			// 로딩 완료 확인
			System.out.println("드라이버 로딩 성공");
		} catch (ClassNotFoundException e) {
			// TODO Auto-generated catch block
			// e.printStackTrace();
			System.out.println("[에러]" + e.getMessage());
		}


		// 연결

		// url(ip, port, databse) / id / password
		String url = "jdbc:mysql://localhost:3307/sample";
		String user = "root";
		String password = "!123456";
		// 연결을 위한 기본 자료

		// 연결을 위한 커넥션
		Connection conn = null;

		try {
			conn = DriverManager.getConnection(url, user, password);
			System.out.println("끝");
		} catch (SQLException e) {
			// TODO Auto-generated catch block
			System.out.println("[에러]"+ e.getMessage());
		}finally {
			if(conn != null) try { conn.close();} catch(SQLException e) {}
		}
	}

}
1-3. 로딩 + 연결
로딩과 연결을 통해 접속하는 코드를 작성해보면 연결에 필요한 변수들을 먼저 선언하고 메서드를 통해 로딩 후, 연결을 시도한다.
import java.sql.Connection;
import java.sql.DriverManager;
import java.sql.SQLException;

public class JDBCEx03 {

	public static void main(String[] args) {

		// 로딩, 연결 정리 (한번에 쓰기)

		String url = "jdbc:mysql://localhost:3307/sample";
		String user = "root";
		String password = "!123456";

		Connection conn = null;


		try {
			Class.forName("org.mariadb.jdbc.Driver");
			System.out.println("드라이버로딩 성공");

			conn = DriverManager.getConnection(url, user, password);
			System.out.println("연결 성공");

		} catch (ClassNotFoundException e) {
			System.out.println("[에러]"+ e.getMessage());
		} catch (SQLException e) {
			System.out.println("[에러]"+ e.getMessage());
		}finally {
			if(conn != null) try {conn.close();}catch(SQLException e) {}
		}
	}

}
2. Statement 와 PreparedStatement
위에서 만든 Connection으로 자바 프로그램과 DB 사이에 연결이 되었다면
이 연결을 통해 자바프로그램은 DB 쪽으로 SQL 문을 전송하고, DB는 처리된 결과를 다시 자바프로그램 쪽으로 전달해야 한다.
바로 이 역할을 하는 객체가 Statement, PreparedSatement이다.
두가지 객체의 차이는
Statement는 객체 생성 이후 sql문을 완성하여 데이터베이스에 바로바로 처리하고
PreparedStatement는 객체를 '?'가 포함된 sql문으로 생성하고, 이후에 '?'자리만 바꿔가며 데이터베이스를 처리한다.
2-1. 객체 생성
Statement 객체 생성은 Connection 객체가 제공하는 createStatement( ) 메소드를 사용한다.
Statement stmt = conn.createStatement();PreparedStatement 객체 생성은 Connection 객체가 제공하는 prepareStatement()메소드를 사용하는데 인자값이 필요하다.
PreparedStatement pstmt = conn.prepareStatement(sql);prepareStatement()는 말그대로 '준비된상태'이므로 준비상태인 '?'가 들어간 String 타입의 SQL문이 인자값이 되어야한다.
String sql = "insert into dept2 values(?, ?, ?)";
PreparedStatement pstmt = conn.prepareStatement(sql);
Statement 객체는 위의 작업을 나중에 한다. PreparedStatement 객체가 미리 하는 거라고 보면된다.
Statement 객체를 활용한 실습을 통해 전체적인 흐름을 터득한 후, PreparedStatement를 실습했다.
실습1 ) Statement - DML(insert)
import java.sql.Connection;
import java.sql.DriverManager;
import java.sql.SQLException;
import java.sql.Statement;

public class JDBCEx04 {

	public static void main(String[] args) {

		// state 만들기

		String url = "jdbc:mysql://localhost:3307/sample";
		String user = "root";
		String password = "!123456";

		Connection conn = null;
		Statement stmt = null;

		try {
			Class.forName("org.mariadb.jdbc.Driver");
			System.out.println("드라이버로딩 성공");

			conn = DriverManager.getConnection(url, user, password);
			System.out.println("연결 성공");

			String sql = "insert into dept2 value (60,'생산','부산')";
			stmt = conn.createStatement();

			// 쿼리의 실행문
			int result = stmt.executeUpdate(sql);
			System.out.println("result : " + result);

		} catch (ClassNotFoundException e) {
			// TODO Auto-generated catch block
			System.out.println("[에러]"+ e.getMessage());
		} catch (SQLException e) {
			// TODO Auto-generated catch block
			System.out.println("[에러]"+ e.getMessage());
		}finally {
			if(stmt != null) try {stmt.close();}catch(SQLException e) {}
			if(conn != null) try {conn.close();}catch(SQLException e) {}
		}
	}

}
---- sql문 형태 3가지
String타입의 sql 문은 3가지 작성법이 있다. 그중 String.format()을 가장 많이 사용한다.
// 1
String sql = "insert into dept2 value (60,'생산','부산')";

// 2
String deptno = "91";
String dname = "개발";
String loc = "원주";

String sql = "insert into dept2 value ("+ deptno + ",'" + dname + "','" + loc + "')";

// 3 - String.format (가장많이 사용)
String sql = String.format("insert into dept2 values (%s,'%s','%s')", deptno,dname, loc);
String sql = String.format("update dept2 set loc = '서울' where deptno = 91");
실습 2) Statement - DDL(create)
import java.sql.Connection;
import java.sql.DriverManager;
import java.sql.SQLException;
import java.sql.Statement;

public class JDBCEx07 {

	public static void main(String[] args) {

		// state
		// DDL

		String url = "jdbc:mysql://localhost:3307/sample";
		String user = "root";
		String password = "!123456";

		Connection conn = null;
		Statement stmt = null;

		try {
			Class.forName("org.mariadb.jdbc.Driver");
			System.out.println("드라이버로딩 성공");

			conn = DriverManager.getConnection(url, user, password);
			System.out.println("연결 성공");

			// DDL
			// result 0으로 나옴
			// String sql = String.format("create table dept3 (deptno int(2), dname varchar(14), loc varchar(13))");
			StringBuffer sql = new StringBuffer();
			sql.append("create table dept4 (");
			sql.append("deptno int(2)");
			sql.append(", dname varchar(14)");
			sql.append(", loc varchar(13)");
			sql.append(");");
			// StringBuffer 를 쓰는 경우
			// executeUpdate(sql.toString())으로 해줘야함

			stmt = conn.createStatement();

			// 쿼리의 실행문
			// 몇개를 실행했는지 알수 있다.
			int result = stmt.executeUpdate(sql.toString());
			System.out.println("result : " + result);

		} catch (ClassNotFoundException e) {
			// TODO Auto-generated catch block
			System.out.println("[에러]"+ e.getMessage());
		} catch (SQLException e) {
			// TODO Auto-generated catch block
			System.out.println("[에러]"+ e.getMessage());
		}finally {
			if(stmt != null) try {stmt.close();}catch(SQLException e) {}
			if(conn != null) try {conn.close();}catch(SQLException e) {}
		}
	}

}
2-2. SQL 문 실행
Statement, PreparedStatement 객체를 이용해 DB 서버로 SQL문을 전송하고 처리 결과를 받아올 것이다.
SQL문을 실행하기 위해 객체에서 제공되는 메소드는 다음과 같다.
- ResultSet executeQuery(String sql)
= > executeQuery( ) 메소드가 반환하는 ResultSet은 select한 결과값을 가지고 있다. - int executeUpate(String sql)
= > executeUpdate( ) 메소드가 반환하는 숫자값은 SQL문 실행(update,delete,insert) 후 영향을 받은 레코드의 개수이다.
Statement 객체 SQL문 실행은 인자값으로 SQL문이 필요하다.
ResultSet rs = stmt.executeQuery(sql);int result = stmt.executeUpdate(sql);PreparedStatement 객체 SQL문 실행은 인자값이 필요하지 않다. (인자값을 넣으면 두번 실행하는 꼴이됨)
ResultSet rs = pstmt.executeQuery();int result = pstmt.executeUpdate();>> ResultSet 란?
ResultSet은 executeQuery() 메소드에서 실행된 select문의 결과값을 가지고 있는 객체이다.

ResultSet 객체가 가지고 있는 select 결과값은 ResultSet 객체의 메소드를 활용해 추출하여 사용한다.
ResultSet 객체의 특징은 내부적으로 위치를 나타내는 커서(Cursor)라는 개념이 있다는 것이다.
다음의 ResultSet 객체의 메소드들은 이 커서의 위치를 이동시킨다.
- void afterLast( ) : 커서를 끝 빈 행으로 위치시키는 메소드
- void beforeFirst( ) : 커서를 시작 빈행으로 위치시키는 메소드
- boolean next( ) : 커서 다음에 레코드가 없으면 false, 있으면 true를 반환 후 커서를 다음 레코드로 이동시키는 메소드
이외에도 ResultSet 객체에는 현재 이동한 커서의 컬럼의 값을 데이터 타입에 따라 추출하는 getter 메소드를 가지고 있다.
getter 메소드의 인자값으로는 칼럼의 이름을 지정할 수도 있고, 칼럼의 인덱스 값을 지정할 수도 있다. 칼럼의 인덱스는 ResultSet 결과값으로 나타난 칼럼의 순서라고 생각하면 된다.
- String getString(int columnInde) : 컬럼의 인덱스로 데이터를 가져옴
- String getString(String columnLabel) : 컬럼의 이름으로 데이터를 가져옴
JDBC ▷p34
한 행을 처리 할땐 if 문을 사용하는데
한행이상을 처리할땐while문을 사용한다. 근데 rs.next()를 꼭 한번은 가져와야한다.
왜? 커서는 rs.next()의 바로 위에 위치하기 때문이다.
따라서 반복문에서 커서의 범위는 [0 ~ 행의 갯수-1]이 아닌 [1 ~ 행의 갯수]가 된다.
실습1) ResultSet 사용 - select
import java.sql.Connection;
import java.sql.DriverManager;
import java.sql.ResultSet;
import java.sql.SQLException;
import java.sql.Statement;

public class JDBCEx08 {

	public static void main(String[] args) {

		// state
		// select - ResultSet

		String url = "jdbc:mysql://localhost:3307/sample";
		String user = "root";
		String password = "!123456";

		Connection conn = null;
		Statement stmt = null;
		ResultSet rs = null;

		try {
			Class.forName("org.mariadb.jdbc.Driver");
			System.out.println("드라이버로딩 성공");

			conn = DriverManager.getConnection(url, user, password);
			System.out.println("연결 성공");


			String sql = String.format("select deptno, dname, loc from dept");

			stmt = conn.createStatement();

			// 쿼리의 실행문
			rs = stmt.executeQuery(sql);
			// dept의 행수 만큼 처리됨
			while(rs.next()) {	// if를 쓰면 맨 처음 한 행만 읽어온다.
				// dept테이블의 행 수 만큼 출력되어야한다.
				// System.out.println("결과 처리");
//				System.out.println(rs.getNString("deptno"));
//				System.out.println(rs.getNString("dname"));
//				System.out.println(rs.getNString("loc"));

				// 순서값으로 쓸수도 있다.
				System.out.println(rs.getNString(1));	// deptno
				System.out.println(rs.getNString(2));	// dname
				System.out.println(rs.getNString(3));	// loc
			}

		} catch (ClassNotFoundException e) {
			// TODO Auto-generated catch block
			System.out.println("[에러]"+ e.getMessage());
		} catch (SQLException e) {
			// TODO Auto-generated catch block
			System.out.println("[에러]"+ e.getMessage());
		}finally {
			if(rs != null) try {rs.close();}catch(SQLException e) {}
			if(stmt != null) try {stmt.close();}catch(SQLException e) {}
			if(conn != null) try {conn.close();}catch(SQLException e) {}
		}
	}

}
실습2) ResultSet 사용 퀴즈1
import java.sql.Connection;
import java.sql.DriverManager;
import java.sql.ResultSet;
import java.sql.SQLException;
import java.sql.Statement;

public class JDBCEx09 {

	public static void main(String[] args) {

		// ResultSet 문제

		String url = "jdbc:mysql://localhost:3307/sample";
		String user = "root";
		String password = "!123456";

		Connection conn = null;
		Statement stmt = null;
		ResultSet rs = null;

		try {
			Class.forName("org.mariadb.jdbc.Driver");
			System.out.println("드라이버로딩 성공");

			conn = DriverManager.getConnection(url, user, password);
			System.out.println("연결 성공");


			String sql = String.format("select empno, ename, job, sal, sal*12+ifnull(comm,0) annual from emp where deptno = 10");

			stmt = conn.createStatement();

			// 쿼리의 실행문
			rs = stmt.executeQuery(sql);

			while(rs.next()) {

				System.out.printf("%s %s %s %s%n", rs.getNString("empno"),rs.getNString("ename"),rs.getNString("job"),rs.getNString("sal"),rs.getNString("annual"));	// empno

			}

		} catch (ClassNotFoundException e) {
			// TODO Auto-generated catch block
			System.out.println("[에러]"+ e.getMessage());
		} catch (SQLException e) {
			// TODO Auto-generated catch block
			System.out.println("[에러]"+ e.getMessage());
		}finally {
			if(rs != null) try {rs.close();}catch(SQLException e) {}
			if(stmt != null) try {stmt.close();}catch(SQLException e) {}
			if(conn != null) try {conn.close();}catch(SQLException e) {}
		}
	}

}
실습3) ResultSet 사용 퀴즈2 - date_format()
import java.sql.Connection;
import java.sql.DriverManager;
import java.sql.ResultSet;
import java.sql.SQLException;
import java.sql.Statement;

public class JDBCEx9 {

	public static void main(String[] args) {

		// ResultSet 문제

		String url = "jdbc:mysql://localhost:3307/sample";
		String user = "root";
		String password = "!123456";

		Connection conn = null;
		Statement stmt = null;
		ResultSet rs = null;

		try {
			Class.forName("org.mariadb.jdbc.Driver");
			System.out.println("드라이버로딩 성공");

			conn = DriverManager.getConnection(url, user, password);
			System.out.println("연결 성공");

			// format을 써서 %를 하나씩 더 붙여줘야함
			String sql = String.format("select date_format(hiredate, '%%Y/%%m/%%d') hiredate from emp where deptno = 10");

			stmt = conn.createStatement();

			// 쿼리의 실행문
			rs = stmt.executeQuery(sql);

			while(rs.next()) {

				System.out.println(rs.getNString("hiredate"));	// empno

			}

		} catch (ClassNotFoundException e) {
			// TODO Auto-generated catch block
			System.out.println("[에러]"+ e.getMessage());
		} catch (SQLException e) {
			// TODO Auto-generated catch block
			System.out.println("[에러]"+ e.getMessage());
		}finally {
			if(rs != null) try {rs.close();}catch(SQLException e) {}
			if(stmt != null) try {stmt.close();}catch(SQLException e) {}
			if(conn != null) try {conn.close();}catch(SQLException e) {}
		}
	}

}
2-3. PreparedStatement를 사용한 쿼리 실행
SQL 문 안에 '?' 를 넣어서 정의 후, 나중에 '?' 부분을 채울수 있다.
'?'부분을 채워 SQL문을 사용하기 위한 메서드는 setString()이다.
- setString(int index ,String data) : index는 '?'의 순서, data는 넣을 값
String sql = "insert into dept2 values(?, ?, ?)";

pstmt = conn.prepareStatement(sql);

pstmt.setNString(1, "92");
pstmt.setNString(2, "개발");
pstmt.setNString(3, "대전");
여기서 setNString()을 썼는데 setNString()은 setString()과 비슷하지만 대부분의 JDBC 드라이버에 구현되어 있지 않으므로 웬만하면 setString()을 쓰는 것이 좋다.
실습1) PreparedStatement - insert
import java.sql.Connection;
import java.sql.DriverManager;
import java.sql.PreparedStatement;
import java.sql.SQLException;

public class JDBCEx10 {

	public static void main(String[] args) {

		// PreparedStatement

		String url = "jdbc:mysql://localhost:3307/sample";
		String user = "root";
		String password = "!123456";

		Connection conn = null;
		PreparedStatement pstmt = null;

		try {
			Class.forName("org.mariadb.jdbc.Driver");
			System.out.println("드라이버로딩 성공");

			conn = DriverManager.getConnection(url, user, password);
			System.out.println("연결 성공");

			// String sql = "insert into dept2 values(92,'개발','대전')";
			String sql = "insert into dept2 values(?, ?, ?)";
			pstmt = conn.prepareStatement(sql);
			pstmt.setNString(1, "92");
			pstmt.setNString(2, "개발");
			pstmt.setNString(3, "대전");

			// pstmt.executeUpdate(sql)로 하면 두번실행될수 있다.
			int result = pstmt.executeUpdate();
			System.out.println("result: " + result);


		} catch (ClassNotFoundException e) {
			// TODO Auto-generated catch block
			System.out.println("[에러]"+ e.getMessage());
		} catch (SQLException e) {
			// TODO Auto-generated catch block
			System.out.println("[에러]"+ e.getMessage());
		}finally {
			if(pstmt != null) try {pstmt.close();}catch(SQLException e) {}
			if(conn != null) try {conn.close();}catch(SQLException e) {}
		}
	}

}
※ 문제
emp -> emp2
1. create table emp2 as select * from emp where 1 != 1;
2. 프로그램 emp 테이블의 데이터를 읽어서 -> insert -> emp2
Statement / PreparedStatement 객체 2개가 필요하다.
1. select하여 값을 검색해 올 객체 - 결과를 담을 ResultSet 객체 필요
2. select한 결과들을 한 행씩 insert할 객체
(1) Statement
import java.sql.Connection;
import java.sql.DriverManager;
import java.sql.ResultSet;
import java.sql.SQLException;
import java.sql.Statement;

public class CopyTableEx01 {

	public static void main(String[] args) {

		// PreparedStatement

		String url = "jdbc:mysql://localhost:3307/sample";
		String user = "root";
		String password = "!123456";

		Connection conn = null;
		Statement stmt = null;
		Statement stmt2 = null;
		ResultSet rs = null;

		try {
			Class.forName("org.mariadb.jdbc.Driver");
			System.out.println("드라이버로딩 성공");

			// 데이터베이스와 연결
			conn = DriverManager.getConnection(url, user, password);
			System.out.println("연결 성공");

			// 처리할 sql문을 String 형태로 저장하고
			String sql1 = String.format("select empno, ename, job, mgr, hiredate, sal, comm, deptno from emp");

			stmt = conn.createStatement();

			rs = stmt.executeQuery(sql1);


			while(rs.next()) {
				// 혹시라도 입력전에 처리작업을 한다면 필요함
				// 행마다 새롭게 선언되면서 값이 넘어감
				String empno = rs.getNString("empno");
				String ename = rs.getNString("ename");
				String job = rs.getNString("job");
				String mgr = rs.getNString("mgr");
				String hiredate = rs.getNString("hiredate");
				String sal = rs.getNString("sal");
				String comm = rs.getNString("comm");
				String deptno = rs.getNString("deptno");

				// 행마다 insert문을 새로 쓰면서 실행
				// 아랫줄처럼 문자열화 시키는 과정이 필요함
				String insert = String.format("insert into emp2 values(%s, '%s', '%s', %s, '%s', %s, %s, %s)", empno, ename, job, mgr, hiredate, sal, comm, deptno);

				//System.out.println(insert);

				stmt2 = conn.createStatement();
				int result = stmt2.executeUpdate(insert);
				System.out.println("result : " + result);

			}


		} catch (ClassNotFoundException e) {
			System.out.println("[에러]"+ e.getMessage());
		} catch (SQLException e) {
			System.out.println("[에러]"+ e.getMessage());
		}finally {
			if(rs != null) try {rs.close();}catch(SQLException e) {}
			if(stmt2 != null) try {stmt2.close();}catch(SQLException e) {}
			if(stmt != null) try {stmt.close();}catch(SQLException e) {}
			if(conn != null) try {conn.close();}catch(SQLException e) {}
		}
	}

}
(2) PreparedStatement
import java.sql.Connection;
import java.sql.DriverManager;
import java.sql.PreparedStatement;
import java.sql.ResultSet;
import java.sql.SQLException;

public class CopyTableEx02 {

	public static void main(String[] args) {

		// PreparedStatement

		String url = "jdbc:mysql://localhost:3307/sample";
		String user = "root";
		String password = "!123456";

		Connection conn = null;
		PreparedStatement pstmt1 = null;
		PreparedStatement pstmt2 = null;
		ResultSet rs = null;


		try {
			Class.forName("org.mariadb.jdbc.Driver");
			System.out.println("드라이버로딩 성공");

			conn = DriverManager.getConnection(url, user, password);
			System.out.println("연결 성공");

			String selectSql = String.format("select empno, ename, job, mgr, hiredate, sal, comm, deptno from emp");
			pstmt1 = conn.prepareStatement(selectSql);

			// insert문을 미리 준비시켜놓고 ?의 값만 while문을 통해 행마다 바뀌도록 함
			// 따라서 Statement를 쓸때처럼
			// while문 안에서 insert문을 선언하고
			// insert문을 문자열화 시키는 과정이 필요없다.
			String insertSql = String.format("insert into emp2 values(?, ?, ?, ?, ?, ?, ?, ?)");
			// pstmt2는 미리 선언되어 준비된 sql문인  insertSql문이 들어간다.
			pstmt2 = conn.prepareStatement(insertSql);

			// select문의 결과로 emp의 모든 행이 들어감
			rs = pstmt1.executeQuery();


			while(rs.next()) {
            			// 값을 바로 넣어줘도 되지만 이렇게 하는게
				// 혹시라도 입력전에 처리작업을 할때 필요함
				String empno = rs.getNString("empno");
				String ename = rs.getNString("ename");
				String job = rs.getNString("job");
				String mgr = rs.getNString("mgr");
				String hiredate = rs.getNString("hiredate");
				String sal = rs.getNString("sal");
				String comm = rs.getNString("comm");
				String deptno = rs.getNString("deptno");

				// 행마다 미리준비된 곳에서 값만 계속 바뀜
				pstmt2.setNString(1, empno);
				pstmt2.setNString(2, ename);
				pstmt2.setNString(3, job);
				pstmt2.setNString(4, mgr);
				pstmt2.setNString(5, hiredate);
				pstmt2.setNString(6, sal);
				pstmt2.setNString(7, comm);
				pstmt2.setNString(8, deptno);

				int result = pstmt2.executeUpdate();
				System.out.println("result : " + result);

			}

		} catch (ClassNotFoundException e) {
			System.out.println("[에러]"+ e.getMessage());
		} catch (SQLException e) {
			System.out.println("[에러]"+ e.getMessage());
		}finally {
			if(rs != null) try {rs.close();}catch(SQLException e) {}
			if(pstmt2 != null) try {pstmt2.close();}catch(SQLException e) {}
			if(pstmt1 != null) try {pstmt1.close();}catch(SQLException e) {}
			if(conn != null) try {conn.close();}catch(SQLException e) {}
		}
	}

}
3. 자원해제
앞에서 DB 관련 처리 작업을 하면서 다음의 객체들을 사용했다.
- Connection : DB 연결 객체
- Statemet 또는 PreparedStatement 객체 : SQL 문 실행 객체
- ResultSet 객체 : select 문 결과를 가지는 객체
이 객체들을 이용해 DB관련 처리 작업이 완료된 다음에는 사용했던 객체들을 메모리에서 해제해야한다. 해제하는 순서는 최근에 사용했던 객체부터 거꾸로 올라가면서 해야한다. 따라서 다음 순서와 같다.
- rs.close( )
- stmt.close( ) 또는 pstmt.close( )
- conn.close( )
finally{
    if(rs != null) try {rs.close();}catch(SQLException e) {}
    if(stmt != null) try {stmt.close();}catch(SQLException e) {}
    if(pstmt != null) try {pstmt.close();}catch(SQLException e) {}
    if(conn != null) try {conn.close();}catch(SQLException e) {}
}
코드를 작성해보면 try~catch로 예외처리가 필요하므로 반드시 실행되어야하는 해제는 finally에서 해줘야한다.
4. MetaData
데이터베이스 정보도 가져올 수 있다. Connection 객체가 제공하는 getMetaData() 메소드를 사용하여 생성한다.
DatabaseMetaData dmd = conn.getMetaData();
이후, DatabaseMetaData 객체 메소드로 데이터베이스 정보를 가져올 수 있다.
실습1) 데이터베이스에 대한 정보 가져오기
import java.sql.Connection;
import java.sql.DatabaseMetaData;
import java.sql.DriverManager;
import java.sql.SQLException;

public class MetaDataEx01 {

	public static void main(String[] args) {


		String url = "jdbc:mysql://localhost:3307/sample";
		String user = "root";
		String password = "!123456";

		Connection conn = null;


		try {
			Class.forName("org.mariadb.jdbc.Driver");
			System.out.println("드라이버로딩 성공");

			conn = DriverManager.getConnection(url, user, password);
			System.out.println("연결 성공");

			// 데이터 베이스에 대한 정보

			DatabaseMetaData dmd = conn.getMetaData();

			System.out.println(dmd.getDatabaseProductName());
			System.out.println(dmd.getDatabaseProductVersion());

			// 데이터베이스 드라이버에 대한 정보
			System.out.println(dmd.getDriverName());
			System.out.println(dmd.getDriverVersion());

			System.out.println(dmd.getURL());
			System.out.println(dmd.getUserName());


		} catch (ClassNotFoundException e) {
			System.out.println("[에러]"+ e.getMessage());
		} catch (SQLException e) {
			System.out.println("[에러]"+ e.getMessage());
		}finally {
			if(conn != null) try {conn.close();}catch(SQLException e) {}
		}
	}

}
MetaData - 주변정보
Database
ResultSet
실습 2) 데이터베이스 내의 컬럼 테이블 정보 가져오기
import java.sql.Connection;
import java.sql.DriverManager;
import java.sql.PreparedStatement;
import java.sql.ResultSet;
import java.sql.ResultSetMetaData;
import java.sql.SQLException;

public class MetaDataEx02 {

	public static void main(String[] args) {


		String url = "jdbc:mysql://localhost:3307/sample";
		String user = "root";
		String password = "!123456";

		Connection conn = null;
		PreparedStatement pstmt = null;
		ResultSet rs = null;

		try {
			Class.forName("org.mariadb.jdbc.Driver");
			System.out.println("드라이버로딩 성공");

			conn = DriverManager.getConnection(url, user, password);
			System.out.println("연결 성공");

			String sql = "select deptno , dname, loc from dept";
			pstmt = conn.prepareStatement(sql);

			rs = pstmt.executeQuery();

			// 쿼리에 대한 정보를 가져온다.
			ResultSetMetaData rsmd = rs.getMetaData();
			// System.out.println(rsmd.getColumnCount());

			// describe
			// 1부터 시작해야 한다. 시작행 바로 위를 가리키고 있기 때문에
			for(int i=1; i<=rsmd.getColumnCount(); i++) {
				// System.out.println(rsmd.getColumnName(i));
				// 위랑 같이 컬럼명 나옴
				System.out.println(rsmd.getColumnLabel(i));
				// 컬럼의 데이터 타입
				System.out.println(rsmd.getColumnTypeName(i));
				// 컬럼의 크기 - 내부 단위 (bit)
				System.out.println(rsmd.getPrecision(i));
				// 컬럼의 사이즈
				System.out.println(rsmd.getScale(i));
				// 컬럼의 크기 - 우리가 알수 있는 단위(byte)
				System.out.println(rsmd.getColumnDisplaySize(i));
				// NULL 허용 여부
				System.out.println(rsmd.isNullable(i));
			}

		} catch (ClassNotFoundException e) {
			System.out.println("[에러]"+ e.getMessage());
		} catch (SQLException e) {
			System.out.println("[에러]"+ e.getMessage());
		}finally {
			if(rs != null) try {rs.close();}catch(SQLException e) {}
			if(pstmt != null) try {pstmt.close();}catch(SQLException e) {}
			if(conn != null) try {conn.close();}catch(SQLException e) {}
		}
	}

}
--- 이 정보들을 describe 형태로 만들기
import java.sql.Connection;
import java.sql.DriverManager;
import java.sql.PreparedStatement;
import java.sql.ResultSet;
import java.sql.ResultSetMetaData;
import java.sql.SQLException;

public class MetaDataEx03 {

	public static void main(String[] args) {


		String url = "jdbc:mysql://localhost:3307/sample";
		String user = "root";
		String password = "!123456";

		Connection conn = null;
		PreparedStatement pstmt = null;
		ResultSet rs = null;

		try {
			Class.forName("org.mariadb.jdbc.Driver");
			System.out.println("드라이버로딩 성공");

			conn = DriverManager.getConnection(url, user, password);
			System.out.println("연결 성공");

			String sql = "select deptno , dname, loc from dept";
			pstmt = conn.prepareStatement(sql);

			rs = pstmt.executeQuery();

			ResultSetMetaData rsmd = rs.getMetaData();

			for(int i=1; i<=rsmd.getColumnCount(); i++) {
				System.out.printf("%-10s %s(%s) %s\n"
						, rsmd.getColumnName(i)
						, rsmd.getColumnTypeName(i)
						, rsmd.getColumnDisplaySize(i)
						, rsmd.isNullable(i));
			}

		} catch (ClassNotFoundException e) {
			System.out.println("[에러]"+ e.getMessage());
		} catch (SQLException e) {
			System.out.println("[에러]"+ e.getMessage());
		}finally {
			if(rs != null) try {rs.close();}catch(SQLException e) {}
			if(pstmt != null) try {pstmt.close();}catch(SQLException e) {}
			if(conn != null) try {conn.close();}catch(SQLException e) {}
		}
	}

}
※ 응용 문제
1)파일(우편번호) -> 테이블
우편번호 테이블
create table zipcode (
zipcode char(7) not null,
sido varchar(4) not null,
gugun varchar(14),
dong varchar(26) not null,
ri varchar(45),
bunji varchar(17),
seq int(5) unsigned not null,
primary key(seq)
);
(1) 내코드 - PreparedStatement
import java.io.BufferedReader;
import java.io.FileNotFoundException;
import java.io.FileReader;
import java.io.IOException;
import java.sql.Connection;
import java.sql.DriverManager;
import java.sql.PreparedStatement;
import java.sql.SQLException;

public class insertZipcode {

	public static void main(String[] args) {

		// 우편번호 데이터파일(csv) -> zipcode테이블

		// 파일 내용 담아올 변수
		BufferedReader br = null;

		// 데이터베이스에 반영하기 위해 정의
		String url = "jdbc:mysql://localhost:3307/sample";
		String user = "root";
		String password = "!123456";

		Connection conn = null;
		PreparedStatement pstmt = null;

		try {
			// 파일 내용 담아옴
			br = new BufferedReader(new FileReader("./zipcode_seoul_utf8_type2.csv"));

			// 드라이버 로딩
			Class.forName("org.mariadb.jdbc.Driver");

			// 드라이버 연결
			conn = DriverManager.getConnection(url, user, password);

			// sql 구문 String으로 저장
			String insertSql = String.format("insert into zipcode values(?, ?, ?, ?, ?, ?, ?)");

			// 미리 미완성된 sql 구문 넣고
			pstmt = conn.prepareStatement(insertSql);

			String address = null;
			while ((address = br.readLine()) != null) {
				String[] addresses = address.split(",");

				// 미완성된 sql구문에 값 넣어주기
				// 행마다 미리준비된 곳에서 값만 계속 바뀜
				pstmt.setNString(1, addresses[0]);
				pstmt.setNString(2, addresses[1]);
				pstmt.setNString(3, addresses[2]);
				pstmt.setNString(4, addresses[3]);
				pstmt.setNString(5, addresses[4]);
				pstmt.setNString(6, addresses[5]);
				pstmt.setNString(7, addresses[6]);

				// pstmt에 이미 prepareStatement(insertSql)로 sql구문이 들어가있고
				// 거기에 마저 값을 넣어서 완성 시킨 형태라서 아래처럼 executeUpdate(insertSql)처럼 인자값을 안줘도 된다.
				int result = pstmt.executeUpdate();
				System.out.println("result : " + result);
			}
		} catch (FileNotFoundException e) {
			System.out.println("[에러]"+ e.getMessage());
		} catch (ClassNotFoundException e) {
			System.out.println("[에러]"+ e.getMessage());
		} catch (SQLException e) {
			System.out.println("[에러]"+ e.getMessage());
		} catch (IOException e) {
			System.out.println("[에러]"+ e.getMessage());
		} finally {
			if(br != null) try { br.close();} catch(IOException e) {}
			if(pstmt != null) try {pstmt.close();}catch(SQLException e) {}
			if(conn != null) try {conn.close();}catch(SQLException e) {}
		}
	}

}
(2) 내코드 - Statement
import java.io.BufferedReader;
import java.io.FileNotFoundException;
import java.io.FileReader;
import java.io.IOException;
import java.sql.Connection;
import java.sql.DriverManager;
import java.sql.SQLException;
import java.sql.Statement;

public class insertZipcode2 {

	public static void main(String[] args) {

		// 우편번호 데이터파일(csv) -> zipcode테이블

		// 파일 내용 담아오기 위한 변수
		BufferedReader br = null;

		// 데이터베이스와 연결 위해 필요
		String url = "jdbc:mysql://localhost:3307/sample";
		String user = "root";
		String password = "!123456";

		// insert만 하므로 담아오는 ResultSet필요없음
		Connection conn = null;
		Statement stmt = null;

		try {
			br = new BufferedReader(new FileReader("./zipcode_seoul_utf8_type2.csv"));

			// 드라이버 로딩
			Class.forName("org.mariadb.jdbc.Driver");

			// 드라이버 연결
			conn = DriverManager.getConnection(url, user, password);

			String address = null;
			while ((address = br.readLine()) != null) {
				String[] addresses = address.split(",");

				String sql = String.format("insert into zipcode value (%s,%s,%s,%s,%s,%s,%s)", addresses[0],
						addresses[1], addresses[2], addresses[3], addresses[4], addresses[5], addresses[6]);

				// stmt를 세팅시키고
				stmt = conn.createStatement();

				// stmt에 sql구문을 가지고 실행시켜야 하므로 인자로  sql 넣어줌
				int result = stmt.executeUpdate(sql);
				System.out.println("result : " + result);
			}
		} catch (ClassNotFoundException e) {
			System.out.println("[에러]"+ e.getMessage());
		} catch (SQLException e) {
			System.out.println("[에러]"+ e.getMessage());
		} catch (FileNotFoundException e) {
			System.out.println("[에러]"+ e.getMessage());
		} catch (IOException e) {
			System.out.println("[에러]"+ e.getMessage());
		} finally {
			if(br != null)try {br.close();} catch (IOException e) {}
			if(stmt != null) try {stmt.close();}catch(SQLException e) {}
			if(conn != null) try {conn.close();}catch(SQLException e) {}
		}

	}

}
나중에 행이 엄청 많은 데이터를 다루게 되면 select * from zipcode; 했을때 시간이 엄청 많이 걸린다.
따라서 순차적으로 제한을 줘서 데이터가 들어갔는지 확인해야한다.
먼저 구조를 확인하고
desc zipcode;
행이 몇갠지 확인하고
select count(*) from zipcode;
몇개만 볼건지 limit를 쓰던지 해서 제한을 줘서 검색해야 한다.
select * from zipcode limit 10;
2) 동이름 입력받아서 주소 검색
* like검색 할때 조심하기
(1) 내코드 - Statement
import java.sql.Connection;
import java.sql.DriverManager;
import java.sql.ResultSet;
import java.sql.SQLException;
import java.sql.Statement;
import java.util.Scanner;

public class SearchZipcode {

	public static void main(String[] args) {

		Scanner sc = new Scanner(System.in);
		System.out.print("동이름을 입력하세요 : ");
		String dong = sc.nextLine();

		String url = "jdbc:mysql://localhost:3307/sample";
		String user = "root";
		String password = "!123456";

		Connection conn = null;
		Statement stmt = null;
		ResultSet rs = null;

		try {
			// 데이터베이스와 연결
			Class.forName("org.mariadb.jdbc.Driver");

			// 데이터베이스와 연결
			conn = DriverManager.getConnection(url, user, password);

			String sql = String.format("select * from zipcode where dong like '%s%%' or ri like '%%s%%'", dong, dong);

			stmt = conn.createStatement();

			rs = stmt.executeQuery(sql);

			System.out.printf("%s동 검색 결과\n", dong);
			while(rs.next()) {
				for(int i =1; i<=7; i++) {
					if(i != 7) {
						System.out.print(rs.getNString(i)+",");
					}else {
						System.out.print(rs.getNString(i));
					}
				}
				System.out.println();

//				System.out.print(rs.getNString("zipcode")+",");
//				System.out.print(rs.getNString("sido")+ ",");
//				System.out.print(rs.getNString("gugun")+ ",");
//				System.out.print(rs.getNString("dong")+ ",");
//				System.out.print(rs.getNString("ri")+ ",");
//				System.out.print(rs.getNString("bunji")+ ",");
//				System.out.print(rs.getNString("seq")+ "\n");
			}
		} catch (ClassNotFoundException e) {
			// TODO Auto-generated catch block
			e.printStackTrace();
		} catch (SQLException e) {
			// TODO Auto-generated catch block
			e.printStackTrace();
		}finally {
			if(rs != null) try {rs.close();}catch(SQLException e) {}
			if(stmt != null) try {stmt.close();}catch(SQLException e) {}
			if(conn != null) try {conn.close();}catch(SQLException e) {}
		}
	}

}
(2) 내코드 - PreparedStatement
import java.sql.Connection;
import java.sql.DriverManager;
import java.sql.PreparedStatement;
import java.sql.ResultSet;
import java.sql.SQLException;
import java.util.Scanner;

public class SearchZipcode2 {

	public static void main(String[] args) {

		Scanner sc = new Scanner(System.in);
		System.out.print("동이름을 입력하세요 : ");
		String dong = sc.nextLine();

		String url = "jdbc:mysql://localhost:3307/sample";
		String user = "root";
		String password = "!123456";

		Connection conn = null;
		PreparedStatement pstmt = null;
		ResultSet rs = null;

		try {
			// 데이터베이스와 연결
			Class.forName("org.mariadb.jdbc.Driver");

			// 데이터베이스와 연결
			conn = DriverManager.getConnection(url, user, password);

			// ? 값
			String sql = String.format("select * from zipcode where dong like ? ");

			pstmt = conn.prepareStatement(sql);

			pstmt.setString(1, dong + "%");

			rs = pstmt.executeQuery();

			System.out.printf("%s동 검색 결과\n", dong);
			while(rs.next()) {
				for(int i =1; i<=7; i++) {
					if(i != 7) {
						System.out.print(rs.getNString(i)+",");
					}else {
						System.out.print(rs.getNString(i));
					}
				}
				System.out.println();

			}
		} catch (ClassNotFoundException e) {
			System.out.println("[에러]"+ e.getMessage());
		} catch (SQLException e) {
			System.out.println("[에러]"+ e.getMessage());
		}finally {
			if(rs != null) try {rs.close();}catch(SQLException e) {}
			if(pstmt != null) try {pstmt.close();}catch(SQLException e) {}
			if(conn != null) try {conn.close();}catch(SQLException e) {}
		}
	}

}
★ xls파일로도 한번 해보기


